How to make dried fruit earrings? from scratch without the dehydrator or silicone molds. I am going to present you very simplified and budget-friendly DIY guide today.
No more hassle of purchasing a dehydrator, all you need is patience and ideation. Most importantly, one has to be super creative. We’ll use dried pomegranate peels and apricot today.
I’ve experimented and invested a lot of time in ideating the process and putting forward the images. The whole idea is to simplify steps for first-timers like me. By the way, I was quite hesitant to try this craft but it’s fun.

How to Make Dried Fruit Earrings- 12 Hassle-free Steps For Beginners
How to make dried fruit earrings? easily at home. The first thing you must decide is the type of fruit you’re going to use, which is super important before you proceed further.
Like I’ve mentioned above, I am using Apricot and naturally dried pomegranate. So without delaying further, let us indulge ourselves in crafting earrings.
Materials Required to Make Apricot Earrings
- 1 Apricot
- Hand gloves
- Knife
- Pair of Stud Pins
- Pair of Push Locks
- Epoxy Resin and Hardener
- E8000 Glue
- Transparent container
- Wooden Spoon or Wooden Stick
- Plastic sheet
- Marker
- Paintbrush
- Charms
Follow These Simple Steps To Make Dried Apricot Earrings at Home
Before we proceed to work with epoxy resin, let me tell you the first thing you should always keep in mind is to wear hand gloves and a mask. Resin jewelry can be harmful in liquid form. That’s why you should wear preventing clothing.
Let me walk you through dried fruit jewelry making using apricot in simple steps with pictures. The first step is to make sure the room temperature is between 18-25 degrees Fahrenheit for epoxy resin.
| STEP1. Cut two thin slices of apricot using a knife |
| STEP2. Mix Epoxy Resin and Hardener in a container |
| STEP3. Mark two shapes on a plastic sheet |
| STEP4. Coat single layer |
| STEP5. Place Apricot slices on the sheet |
| STEP6. Double Coat on Apricot Slices |
| STEP7. Decorate |
| STEP8. Add Sparkles |
| STEP9. Let the Resin Cure for 24 Hours |
| STEP10. Rip off Cured Resin from the Sheet |
| STEP11. Glue Stud Pins at the Back |
| STEP12. Ready to Wear |

STEP1. Cut two thin slices of apricot using a knife
Well, you need to cut equal shapes of apricot using a knife. This task is effortless as dried apricot is soft and easy to cut. I don’t think it’s a tough job.
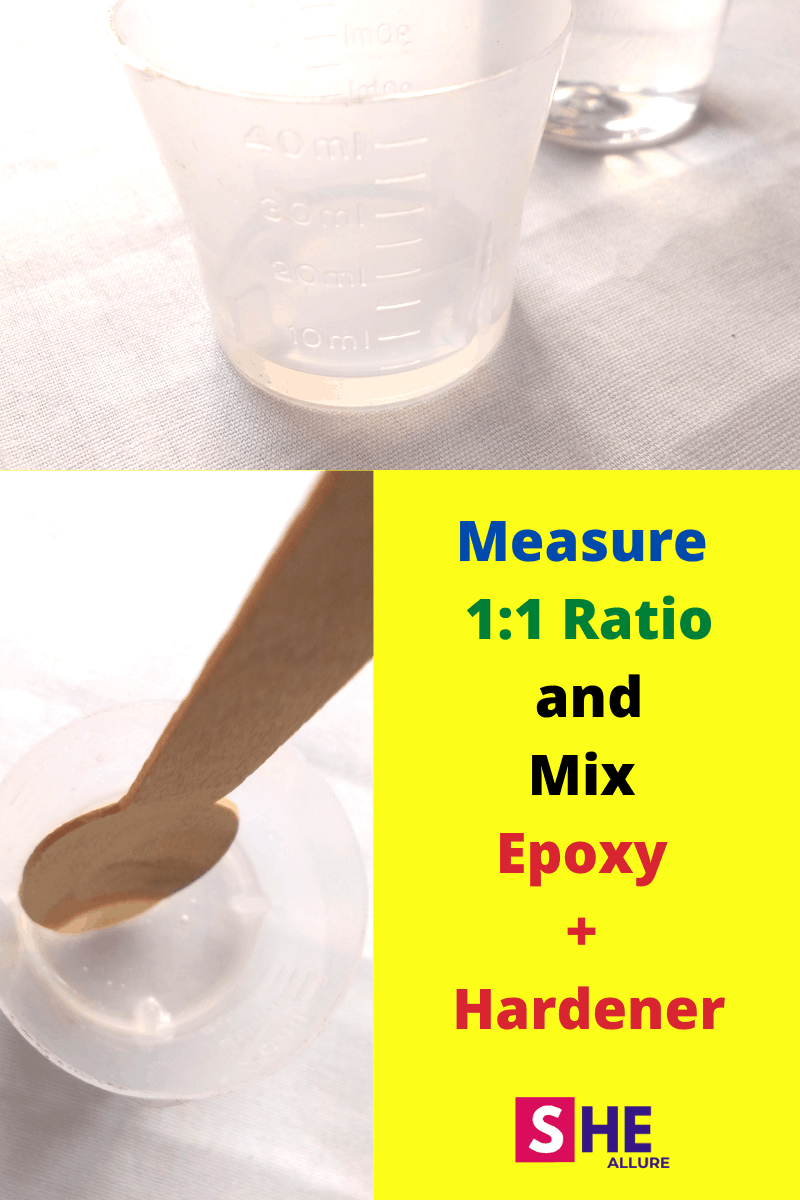
STEP2. Mix Epoxy Resin and Hardener in a container
The second crucial step is mixing equal proportions of epoxy and hardener. Pour 1:1 ratio into the container. Use a wooden spoon or stick and mix it well.
STEP3. Mark two shapes on a plastic sheet
We are not using silicone molds here, so you need to place a plastic sheet on a table and mark two desired shapes to make earrings.
STEP4. Single Coating
Once you’ve drawn shapes, the next step is to coat a single layer using a thin paintbrush. This is required to allow one side of apricot slice gel up with epoxy resin.
STEP5. Place Apricot slices on the sheet
Now, place two apricot slices on the layer which was performed in the previous step.
STEP6. Double Coat on Apricot Slices
Coat another layer on the upper portion of apricot slices using a paintbrush. You’ll see the beautiful glossy effect of apricot slices. I love it.
STEP7. Decorate
Let us decorate using charms. I am using diamond-looking charms around the apricot slice boundaries. Take the help of a tweezer to hold small charm beads and slowly decorate one by one.
STEP8. Let the Resin Cure for 24 Hours
We’ve reached the most important step – Cure epoxy resin. You have to be very patient because epoxy takes time to cure but gives incredible outcomes. Let it cure for at least 24 hours, keeping in mind the temperature.
STEP9. Rip off Cured Resin from the Sheet
Once it is cured overnight, you’ll see the gorgeous transparent look of the earrings the next day. Rip off the cured resin from the plastic sheet and finally trim uneven corners using a scissor.
STEP10. Glue Stud Pins
Last but not least, use E8000 glue stud pins at the backside of earrings and it’s all good to go.
STEP11. Ready to wear
Voila! Your stunning earrings are now ready to wear. Use push locks at the back of stud pins once you wear them.
Important Note: If you’re teaching food jewelry crafts for kids. Please use art resin instead of epoxy. Art resin is safer than epoxy.
Sparkly Dried Peeled Pomegranate Earrings to Try at Home
Pomegranate is naturally dried up in sunlight and it was left for at least 10-12 days under sunlight. So, you have to very patient while making this craft.
Do you know Resin does not cure moisture? Well, Keeping this crucial fact in mind, I have used peels. Let’s try making stunning earrings today and see what happens.
Materials Required
- 2 Dried Pomegranate Peels
- Stud Pins
- Push Locks
- Epoxy Resin + Hardener
- E6000 Super Glue
- Transparent Container
- Wooden Spoon or Wooden Stick
- Plastic Sheet
- Marker
- Paintbrush
- Sparkles for Decorating
14 Crucial Steps to Make Naturally Dried Earrings From Pomegranate Peels
As I’ve said earlier, I have used naturally dried pomegranate to make fashionable earrings at home. All you need is to let it dry under natural sunlight for at least 7-10 days as we’ll use epoxy resin.
Gather all essential materials on a table. You don’t need silicone molds for resin crafts. Here are eleven crucial steps so please read them very carefully.
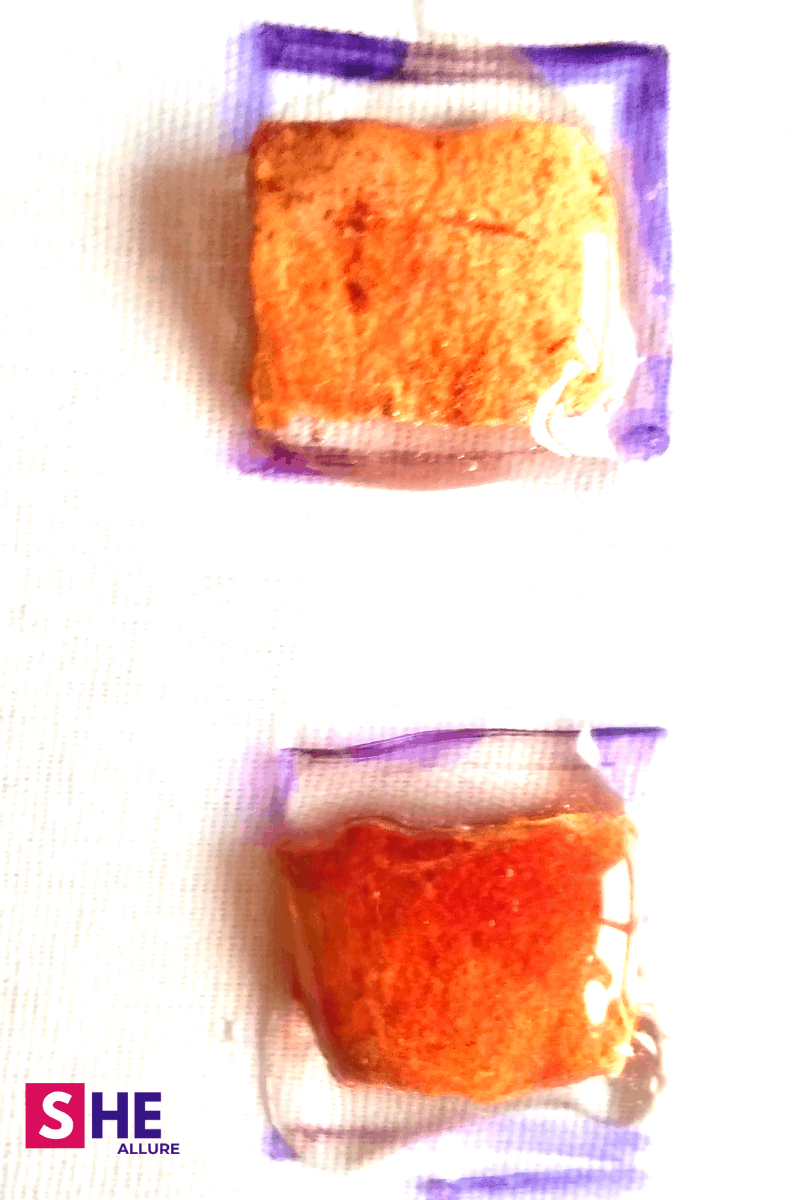
STEP1. Cut Square Shaped Pomegranate Slices
Take a vegetable cutting slab and a knife and cut about 1 cm square-shaped pomegranate peel. I can show you how I accomplished this task in the kitchen.
Note that, pomegranate is totally dried up so cut slices very carefully. Also, my message to all the lovely kids please get it cut from your mom. Do not harm yourself anyway.

STEP2. Wear Preventive Clothing
Since you will be working with epoxy resin, the first crucial step is to wear hand gloves and a mask. The reason being, epoxy in liquid form can be harmful hence take these precautions with a correct room temperature.
I have explained the detailed guide in one of my recent blogs you can give it a read if you like. This is very important for anyone who has never tried resin jewelry making.
STEP3. Take Equal Proportionate Epoxy Resin in a Container
Find a proper room temperature because epoxy works well in hot temperatures. Take a container and pour 1:1 epoxy and hardener.
STEP4. Mix Resin well
Mix it well until the while particles are completely gone using a wooden spoon.
STEP5. Draw shapes on the sheet
Take a thin plastic sheet and place it on a table. As we aren’t using silicone molds so we will prefer the plastic sheet. Draw a couple of square shapes using a marker.

STEP5. Coat a single layer
First, coat a single layer where you’ve drawn the shapes. Place pomegranate peel on it. The coating is done to ensure the peel fixed fairly when the resin cures.
STEP6. Coat the second layer on slices
Apply a second layer coat on the upper part of the peel thoroughly. This is very important to encapsulate the peels inside the epoxy resin.
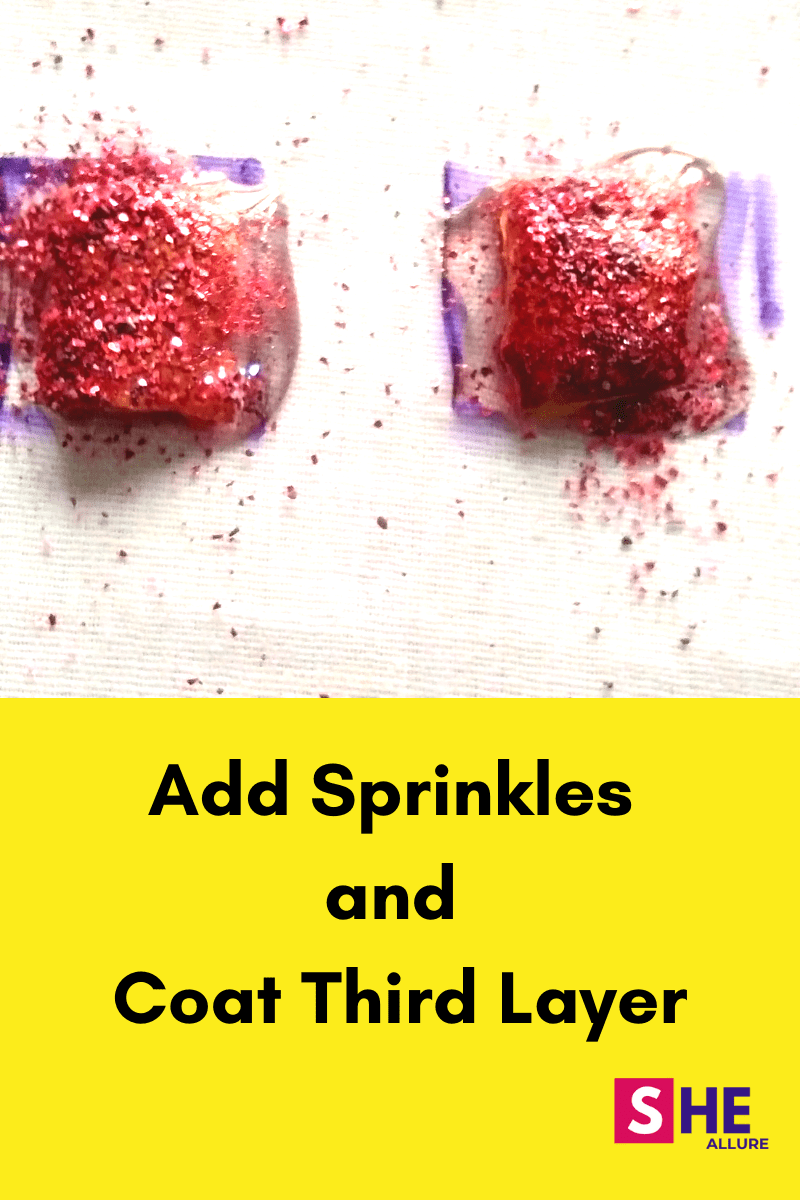
STEP7. Add Sparkles
Add sparkles over the top of the peels carefully and coat the third layer above it. This will not let the sparkles come out. The resin will do a wonderful job of encapsulating sparkles.
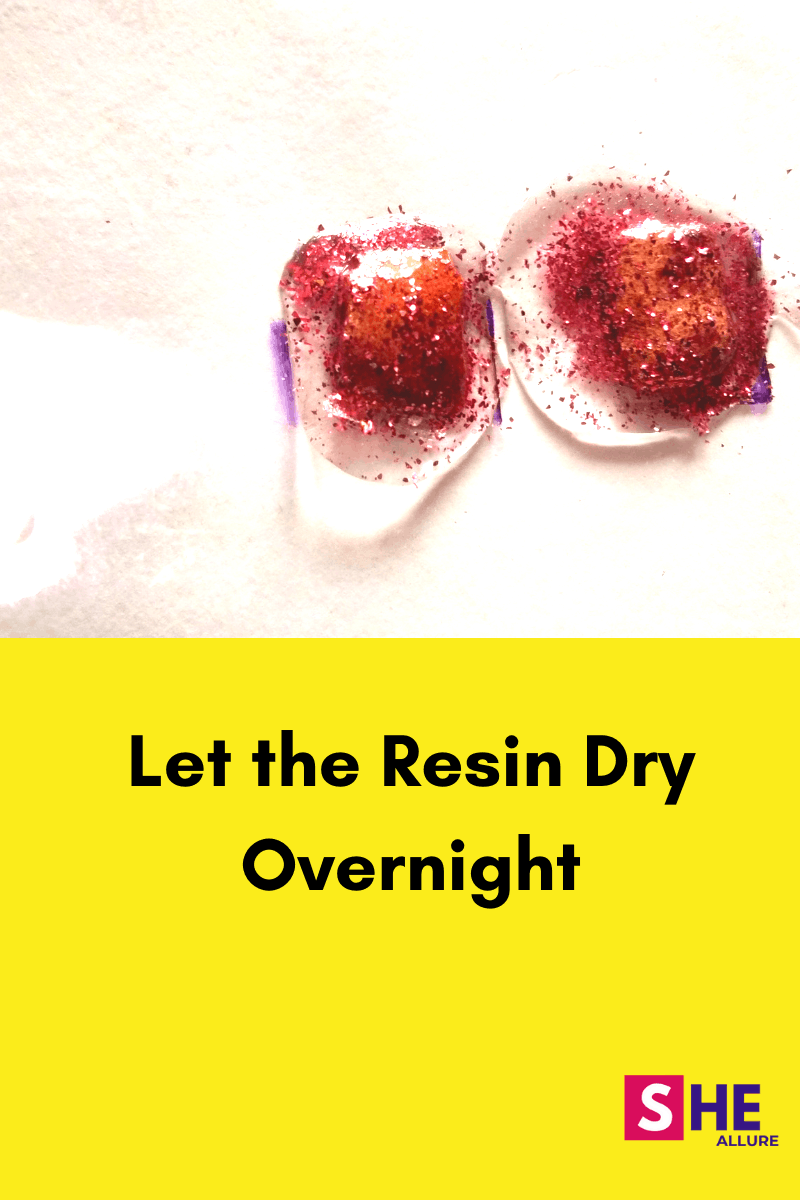
STEP8. Let the resin cured completely overnight
Epoxy resin requires 24 hours to dry. Hence, let it dry overnight and see the glossy effect the next morning.
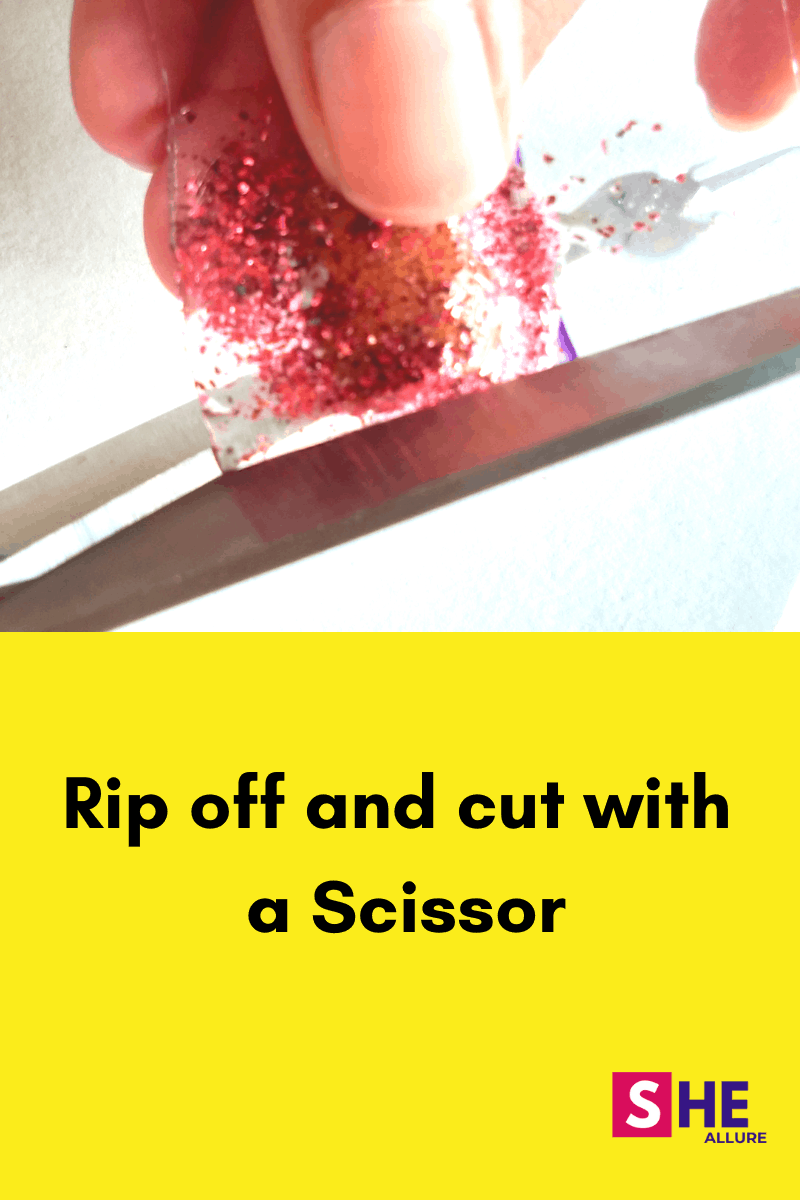
STEP9. Rip off cured resin from the sheet
Remove the cured resin from the plastic sheet with your hand slowly. Else just cut it with a scissor as per the shape.
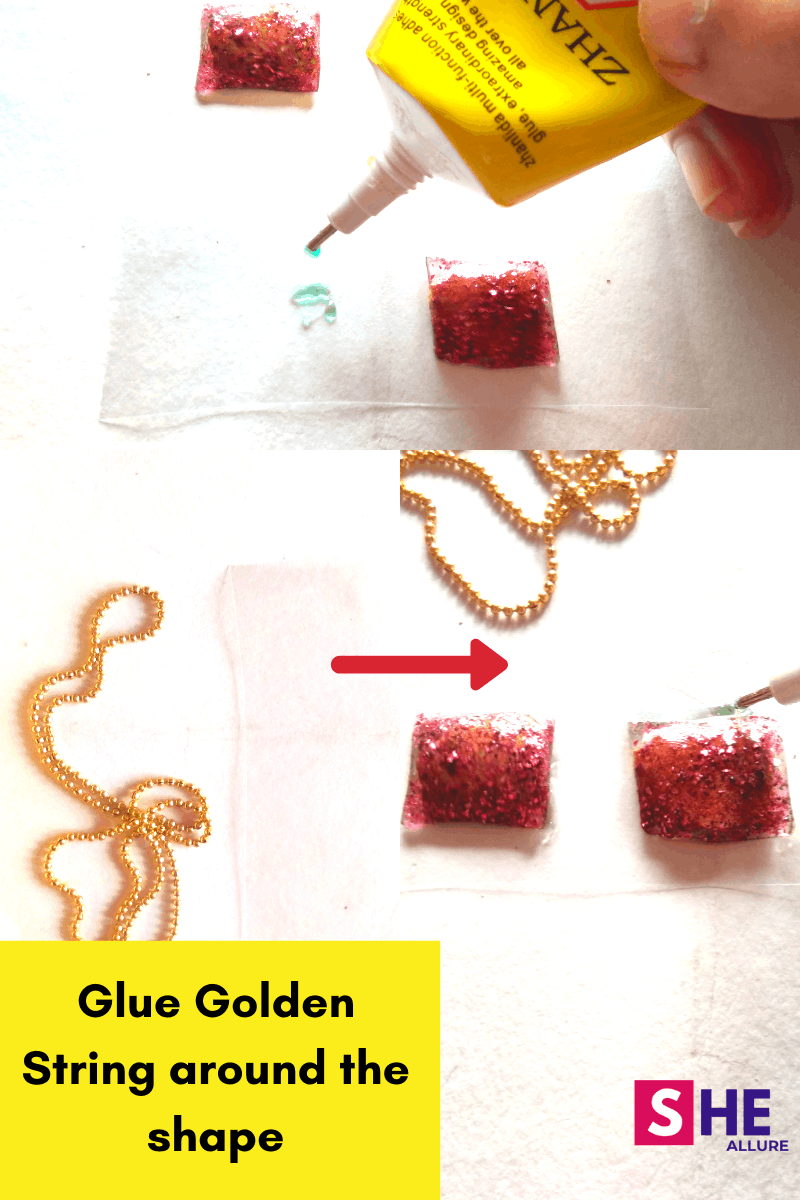
STEP11. Use Golden Strings for Boundaries
We need to make resin shapes more appealing. Use E6000 glue around the boundaries of resin shapes which are all cured. Place golden strings on the glue and allow them to dry for few seconds.
STEP12. Glue stud pins at the back
Apply E6000 or E8000 glue at the back of resin earrings. This is a very important step so make sure your ears are pierced beforehand. Finally, use push locks to lock your stud pins. All done, you’re looking gorgeous. Slay it.

STEP14. Dried Fruit Earrings is Ready to Wear
Your dried pomegranate earrings are now ready to flaunt. Just insert push locks at the back. Looking lovely.

Can Dried Fruits Earrings Be Made Without Resin?
Well, if this question ever crossed your mind I would say – Yes! you can easily make dried fruit earrings without resin. Let me give you a very interesting idea. Use dried resin and start sewing one by one and make a knot at the end.
This idea is perfect for kids and teens who are looking forward to crafting easy ways. By the way, you can also use dry figs known as “anjeer” in India for making beautiful earrings. Just add an earring hook at the top of the dried fig and it’s all done.
Inspiring Story of a Super Talented Artist – Talia Santos
It takes me immense to talk about an extraordinary talent for making citrus fruit earrings. Talia Santos is an amazing jewelry artist and quoted that she grew as greek and lemons have been a huge part of her life.
Talia makes gorgeous dried lemon jewelry and knows varnishing art as well. Read her inspiring story at news.wttw.com
Friends, I hope you find this tutorial helpful. If you have any doubts/clarifications in mind don’t hesitate to drop in your comments. I’ll surely help you. Do try yourself at home and feel free to share your experience with me.
Thank you for your valuable time reading this tutorial. Stay tuned for more unique ideas till then happy crafting and stay safe.