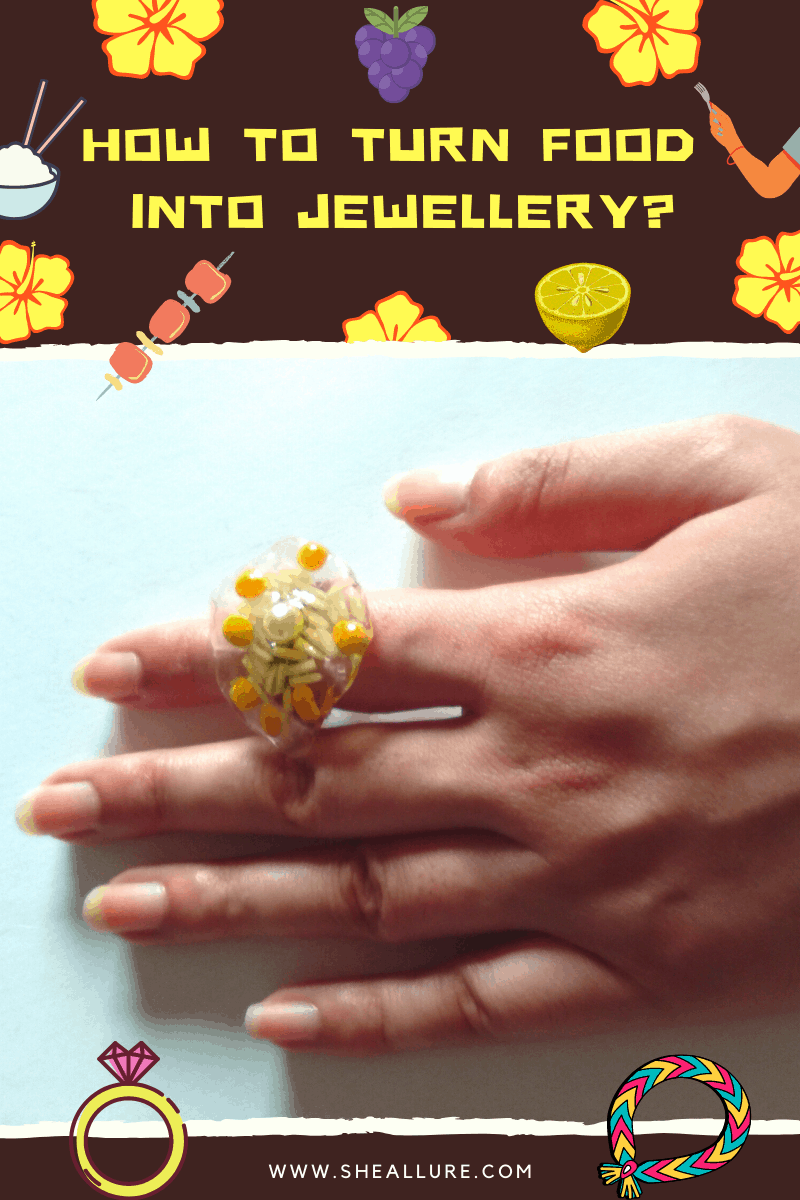
How to turn food into jewellery? Well, I am sure you guys are feeling hungry just like me. Why not think out of the box and craft the most mouth-watering foodstuff into stunning pieces for yourself.
On that note, today I’m delighted to teach you how to make jewellery out of dried foodstuff. I am sure kids will gonna love this tutorial. It’s time to call your little ones right now and have fun with them.
Friends, I have planned to use uncooked food items like pulses (Yellow Split Peas), rice, and macaroni for making jewellery and thereby use resin to encapsulate food as a protective layer.
How to Turn Food Into Jewellery? A Complete Guide for Kids and Teens
How to turn food into jewellery? with the help of epoxy resin. For kids, Please keep in mind – Always use Artresin which is safe for your kids instead of epoxy.
Since I have epoxy resin available with me, I will use them along with pulses as my core ingredients. The resin will protect food from attracting insects and tarnishing.
Let’s Make Something Interesting Out of Uncooked Pulses and Rice
It’s time to awaken your imagination, think out of the box, and make jewellery out of food items. This is super easy and highly recommended for kids. Let me share a glimpse of this tutorial with you. Take a look and learn with me.
| STEP1. Gather Supplies |
| STEP2. Mix Epoxy and Hardener Equally |
| STEP3. Outline Shape on Plastic Sheet |
| STEP4. Put Pulses on Shape |
| STEP5. Pour Resin on Pulses (Yellow split peas) |
| STEP6. Let Resin Cure |
| STEP7.Strip off Cured Resin |
| STEP8. Make Ring base from Paper Clips |
| STEP9. Thread Wrap on Ring Base |
| STEP10. Connect Ring Base Using Adhesive |
| STEP11. Let it dry |
Now, let us dig in and learn a complete step-by-step tutorial with pictures.
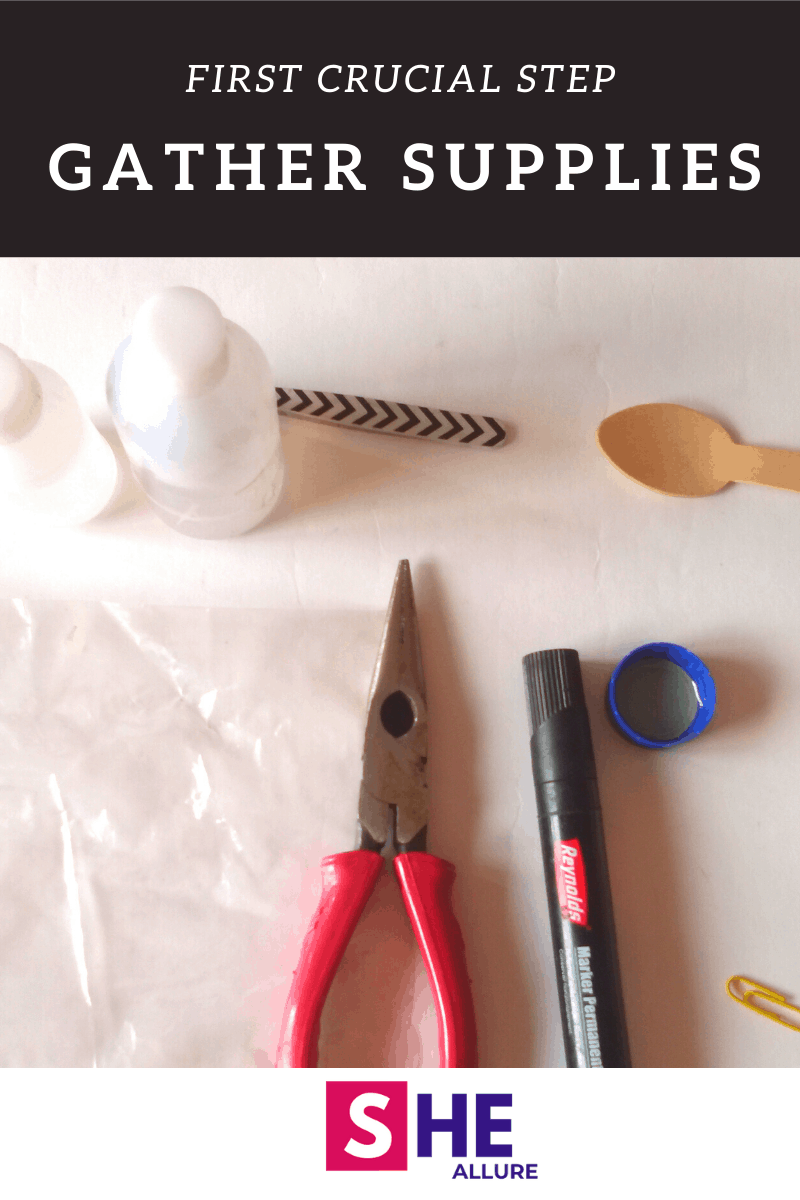
STEP1: Gather Supplies
The first step to gather essential supplies. Let me list out of materials you’ll need to make jewellery out of food.
- Pulses (Yellow Split Peas)
- Epoxy resin and Resin Hardener
- Container
- Plastic Sheet
- Marker
- Paper Clip
- Tweezer
- E6000/E8000 Glue or Super Glue
- Flat Nose Plier
- Thread
- Adhesive
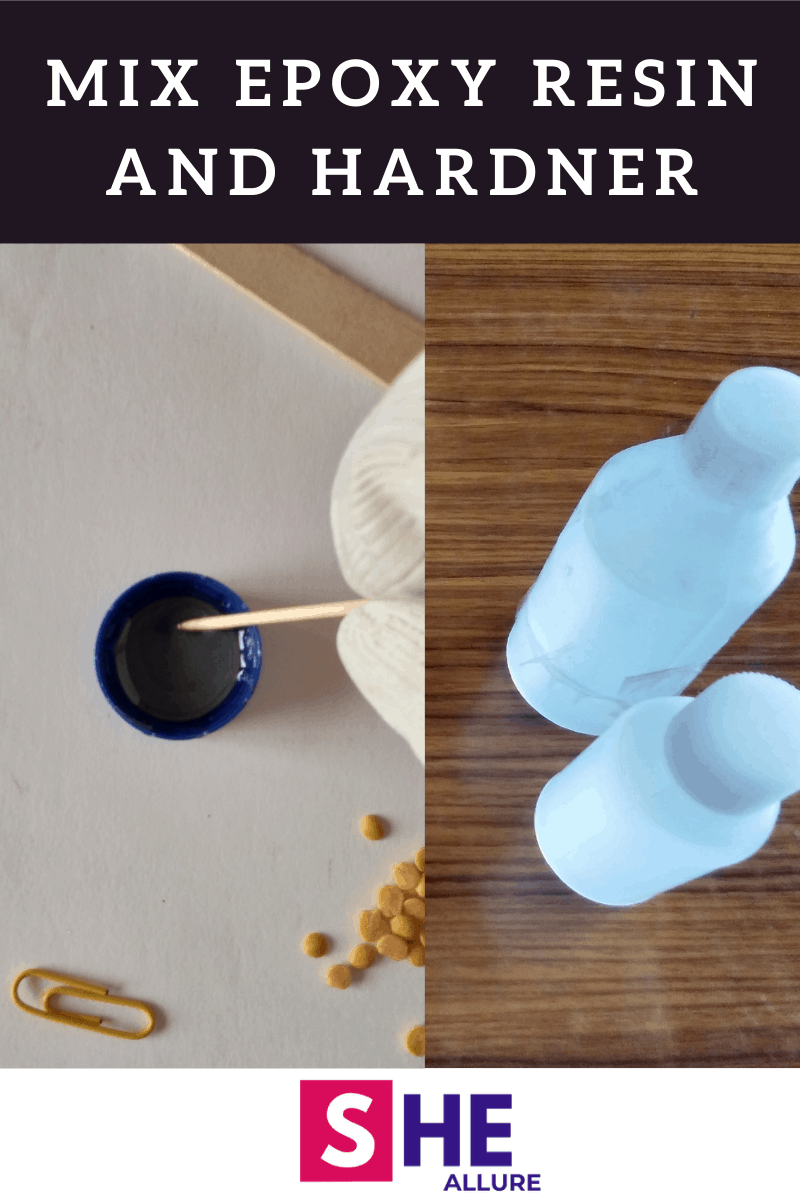
STEP2. Mix Epoxy and Hardener
The first crucial step is to wear preventive clothing – Mask and Hand gloves. This is required as the liquid resin could be harmful to your skin and respiratory issues. Please be careful when working with resin.
Take a small container, pour a 50:50 ratio of epoxy and hardener. Mix it well until the white bubbles are gone. For kids, Art Resin is recommended and that is absolutely safe.
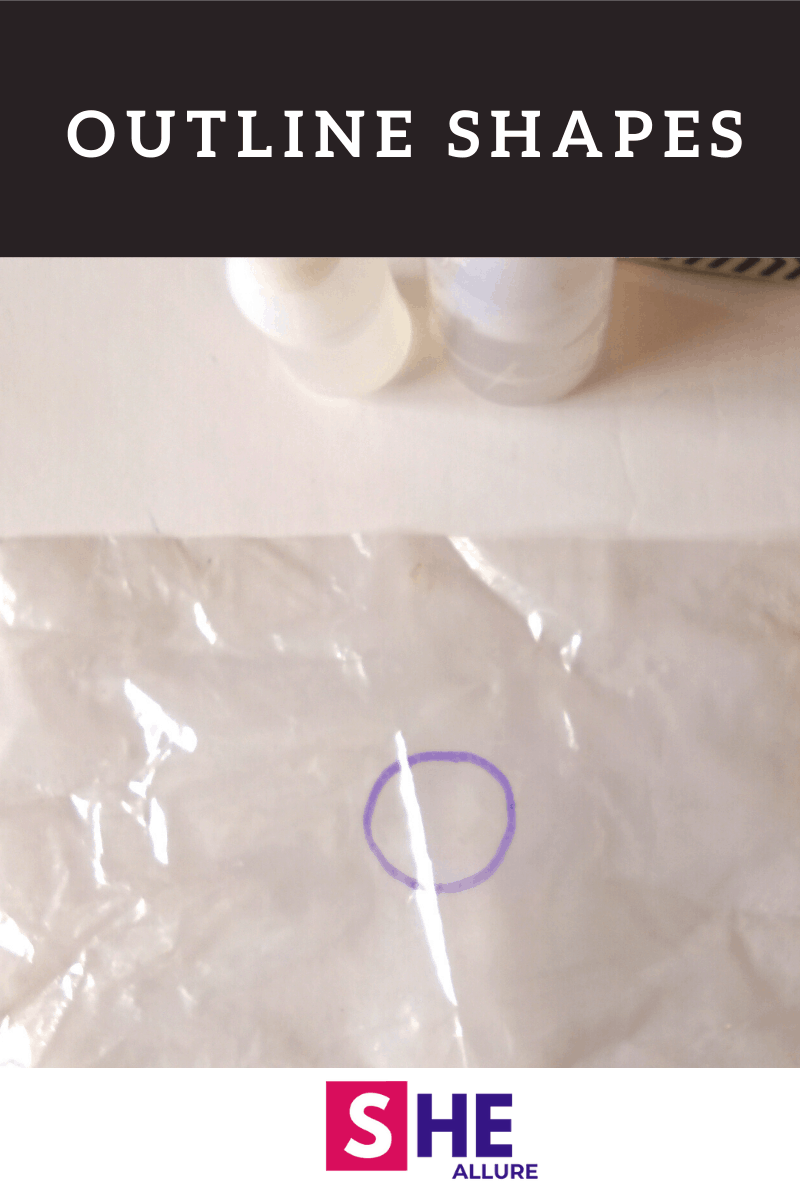
STEP3. Outlining Shapes on Sheet
Place a plastic sheet on a table. A plastic sheet is required for using epoxy resin. The plastic sheet allows the cured resin to be removed easily by hand.
Draw an outline on the plastic sheet you want the desired shape of your ring. Let me show with the help of a graphic.
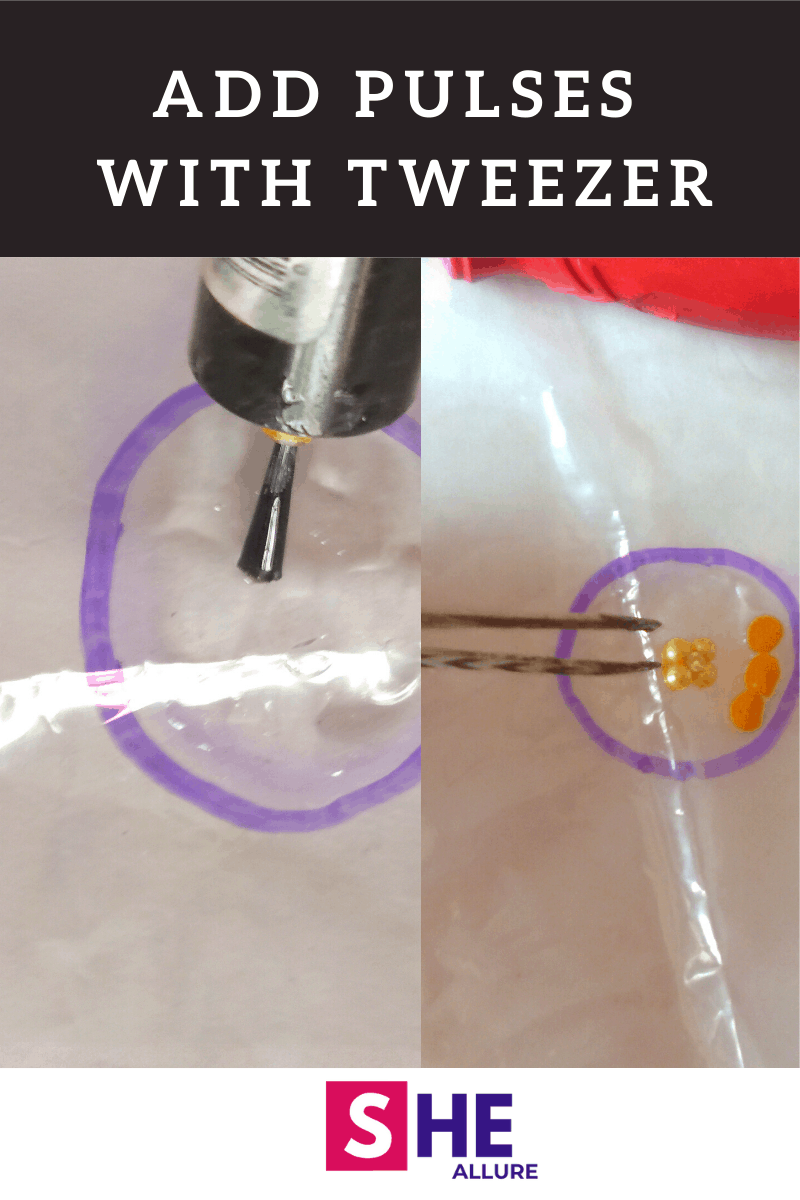
STEP4. Put pulses on Sheet
This is what we call the designing phase. Add a single layer of resin then start putting start to put pulses (yellow split peas) with a tweezer onto the shape. You can even use rice and make beautiful design patterns.
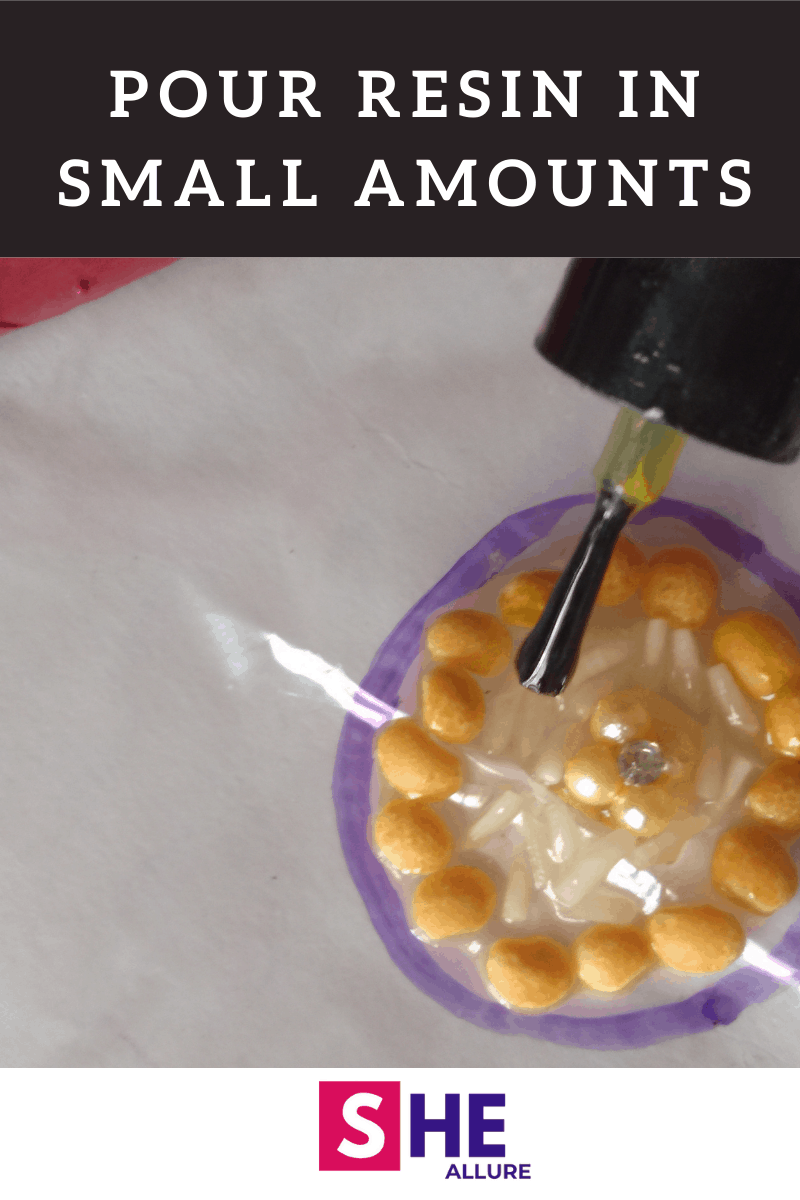
STEP5. Pour Resin
Now, pour resin on the pulses as a coating with a brush or nail-paint brush. Make sure you pour in adequate amounts to preserve the pulses.
STEP6. Let it cure
Epoxy resin takes at least 24 hours to completely cure. I would strongly recommend leaving it overnight.
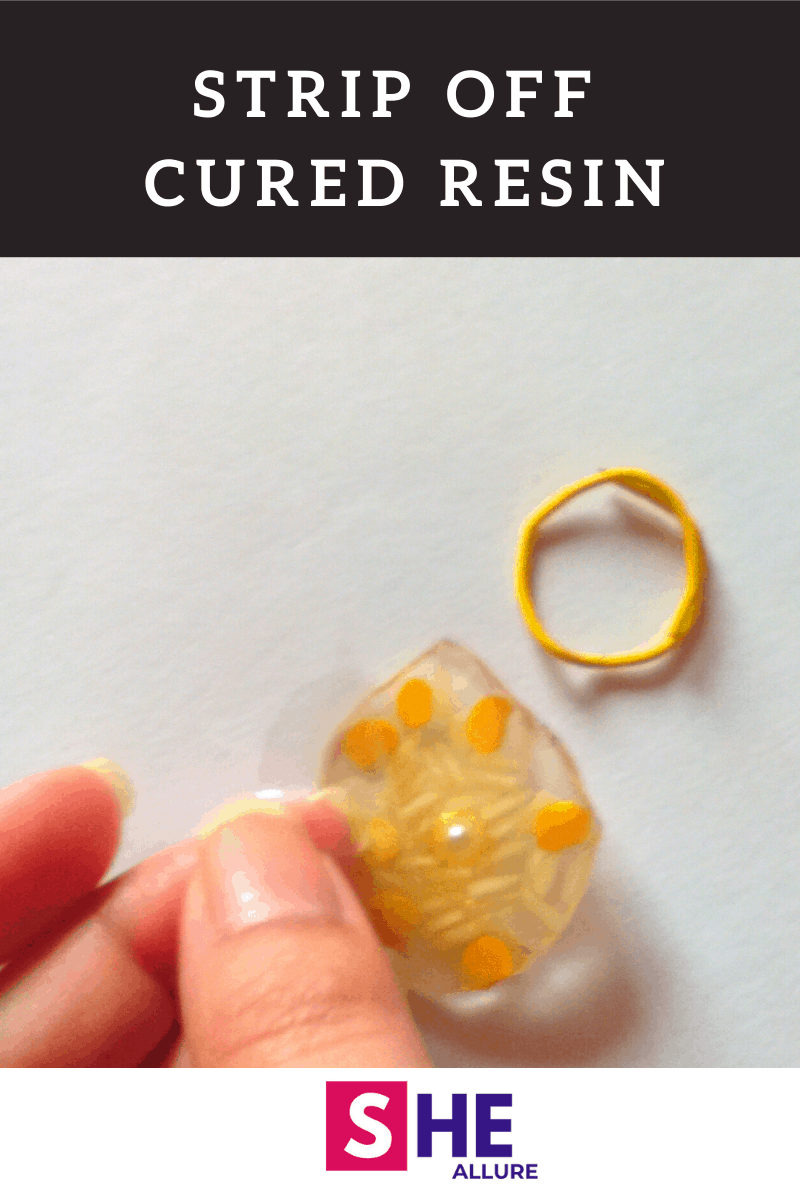
STEP7. Strip off from The Sheet
Once the epoxy resin is fully cured you need to strip it off from the plastic sheet. It can be easily done with your hand.
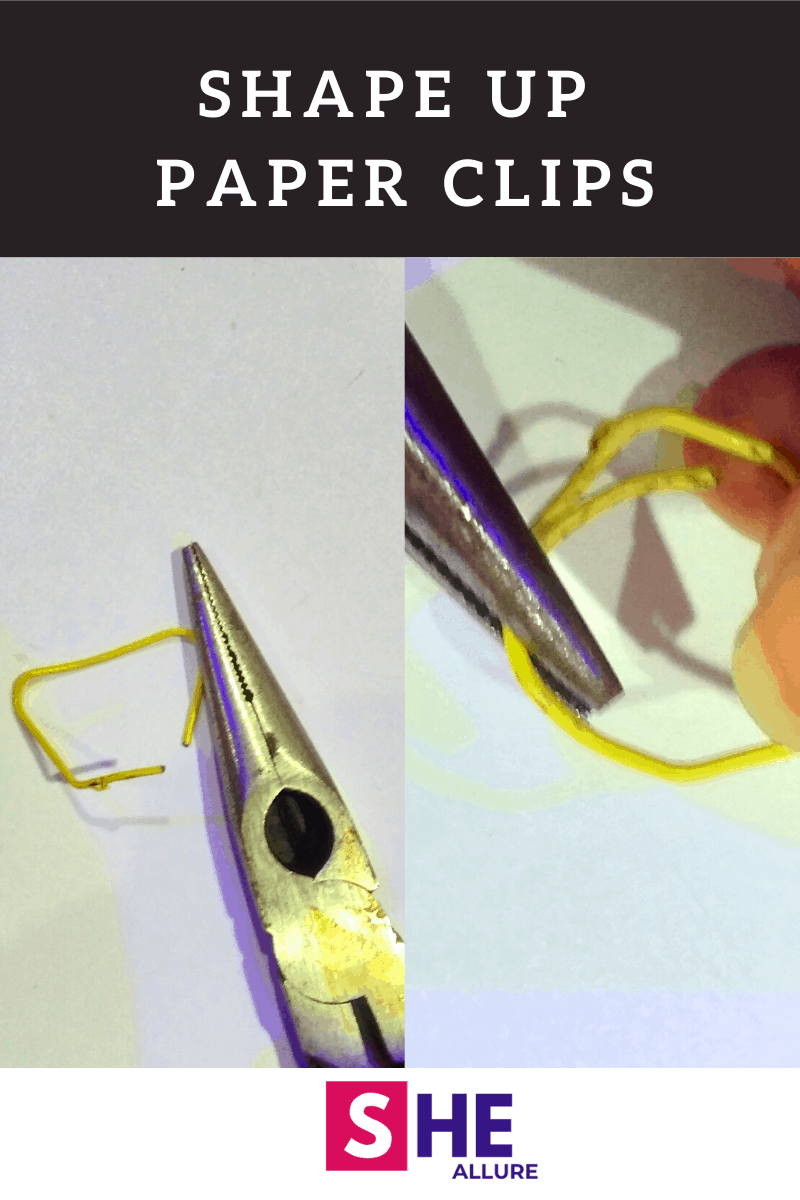
STEP8. Shape up Paper Clips
Take a paper clip, open it fully, and start to shape them with a flat nose plier to make a ring base. Bend slowly and make a circular shape out of them.
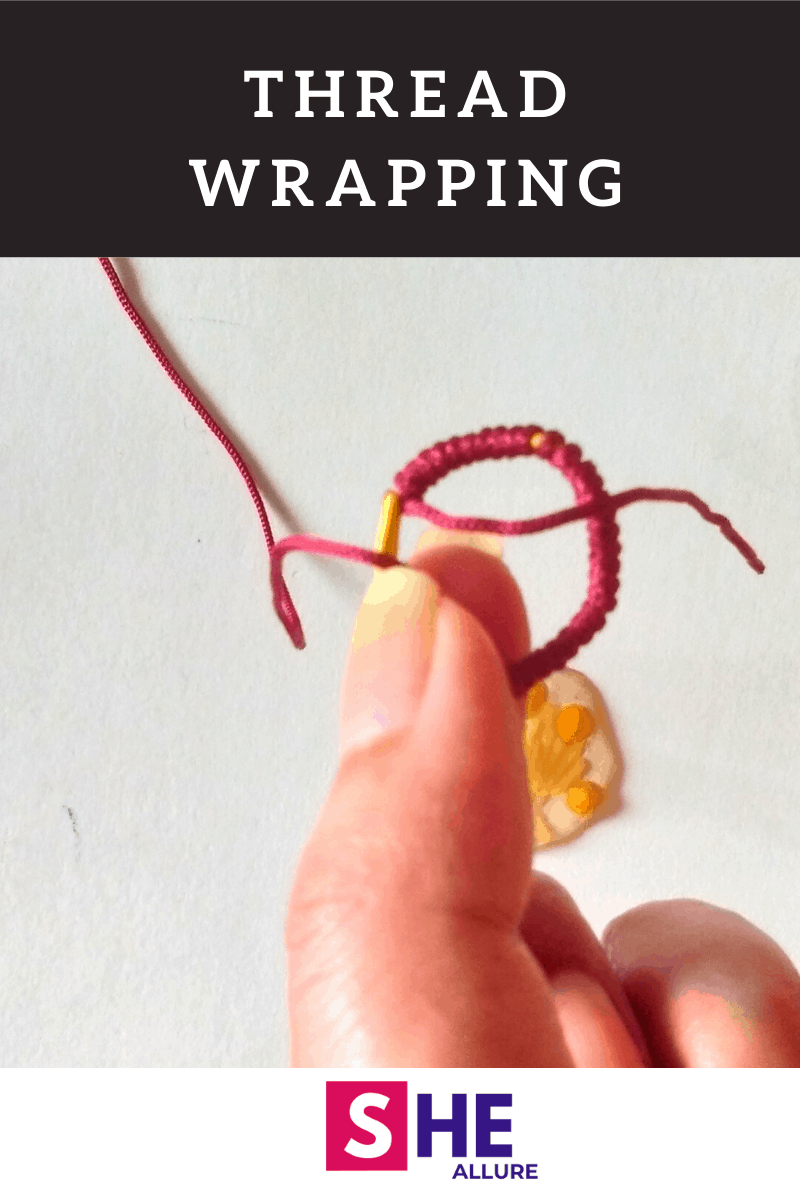
STEP9. Thread Wrap Around Ring Base
Now, this is an important step, start wrapping thread on the ring base that you made with a paper clip until you reach the end. This is a wonderful way to decorate the base of your ring. Let me show a small snippet.
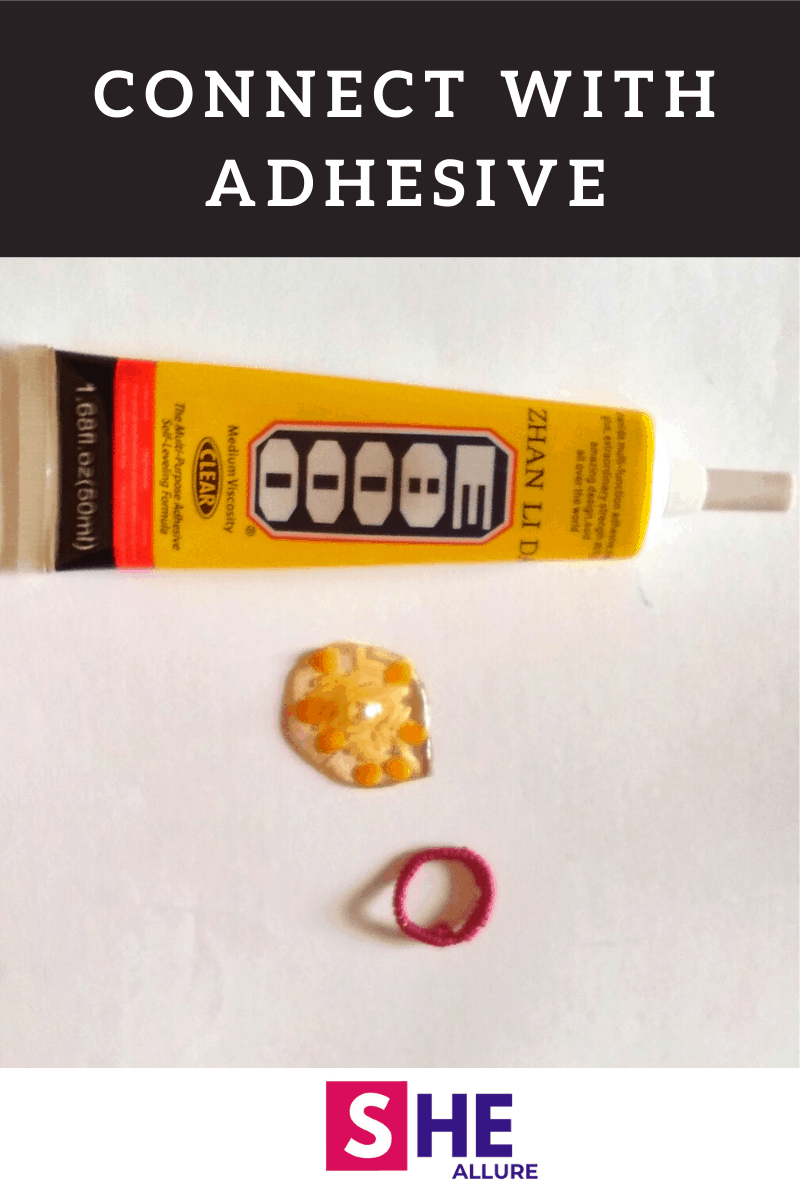
STEP10. Connect Ring Base using Adhesive
We have almost reached the final step, use strong adhesive (I would recommend Fabric Glue or E6000 glue), and connect your ring base with a finished piece of resin.
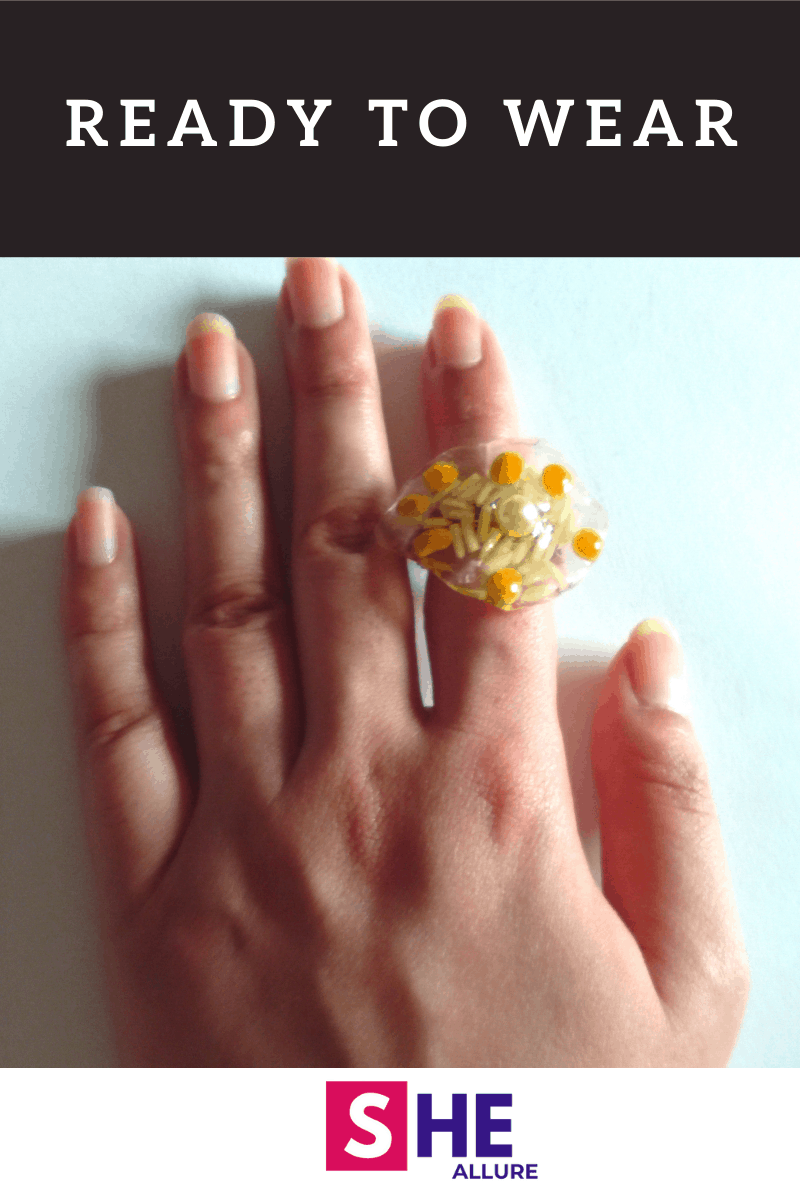
STEP11. Let it Dry
Let your jewellery dry for a few hours till the adhesive is all glued up. You are all set to wear your ring.
FAQ’s to DIY Food Jewellery with Resin You Must Read Now
Turning basic pulses into jewelry is undoubtedly fun activity for both kids and adults but working with resin especially with moist weather was quite difficult because it takes longer to cure.
Today, I feel ecstatic to see a creative piece designed out of pulses and resin and I am sure you guys would give it a try at home. Don’t forget to share your experience with me.
Here is a small FAQ section for you just to address some questions you may have in mind. Still, if you have any questions or suggestions feel free to drop them in the comment section below. I would be more than happy to help you out. Take a look.
Q1. Can we use fruits with resin to make jewellery?
Ans. No, this is because fruits are watery which don’t gel with epoxy resin. Hence avoid combining foodstuff that has moisture. However, you can make stunning pieces out of fruits but they need to be completely dried. You can a dehydrator in that case.
Q2. How long does it take to cure epoxy resin and what are the disadvantages?
Ans. It depends on the kind of resin you are considering while making a jewelry piece. UV resin cures faster than epoxy. The biggest disadvantage while working with resin is that if you don’t mix in correct proportions, it won’t cure and you will be disappointed.
Q3. Can we use fabric glue to connect resin with the ring base?
Ans. Yes, you can use regular fabric glue after thread wrapping around the ring base. I used E8000 glue as it works best for crafting and glues well. This is my favorite glue.
Q4. How many coats of epoxy resin to be applied to make a finished resin ring?
Ans. Before using pulses, first, apply a thin coat of resin then add pulses. Make a beautiful design and then repeat the step and apply once more.
Q5. Instead of a ring base from paper clips what is another way to get a ring base?
Ans. You can surely purchase a readymade ring base online from Amazon or a craft store.
Q6. Is epoxy resin safe for Kids?
Ans. I would only recommend Artresin for kids which completely safe to use.
Q7. Can Resin rings break easily?
Ans. Well, my subtle answer to this question is – No. Epoxy resin has a thermosetting property, takes 24 hours to cure, and gives a perfect stronger finished piece.
Q8. What is the minimum age group of using Art-resin with kids?
Ans. I would advise a 10+years age group else I strongly insist parents sit with their kids and do the mixing task. Ask them to add embellishments. You can read my entire blog on resin jewellery safety.
How to Turn Macaroni Into Stunning Necklace?
Macaroni is the kid’s favorite food that can be incredibly turned out into making stunning jewellery pieces at home. If you are a parent or a teacher looking for creative ideas to teach them. Here I come up with a very easy and sweet tutorial for your little ones. Let’s start.
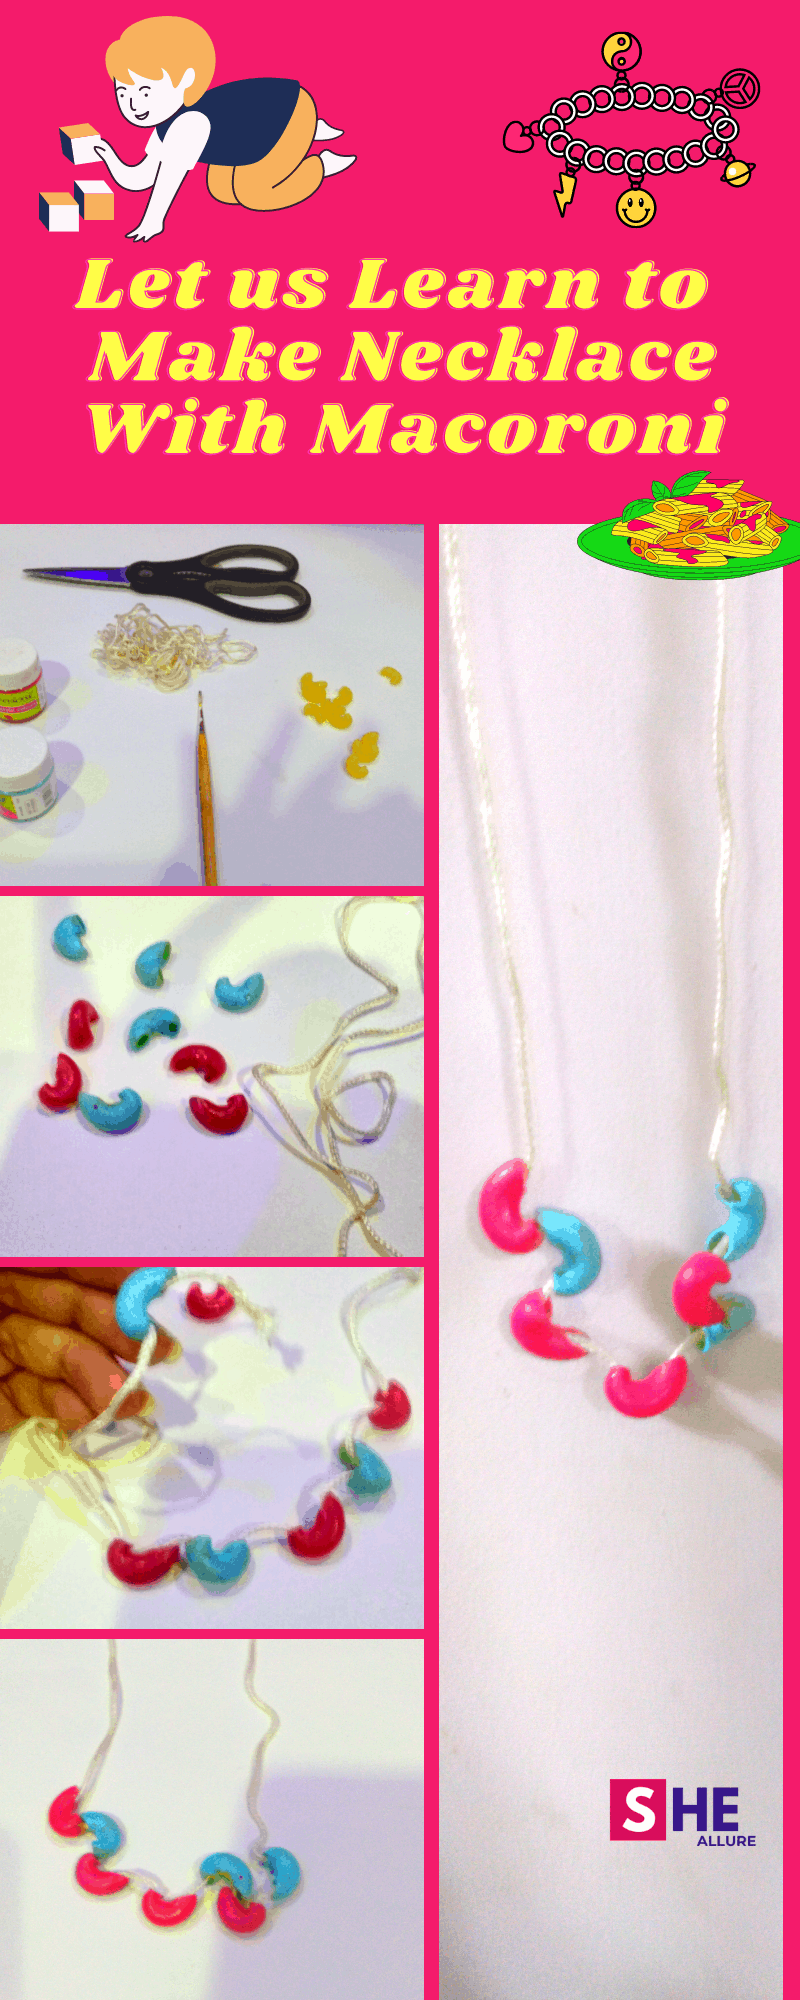
STEP1. Supply Gathering
Find a separate workspace and gather the following supplies. Let me list it out for you.
Things You’ll Require
- Macaroni
- Scissor
- Acrylic Paint Colours
- Paintbrush
- Thread
STEP2. Correct Measurement
The first very crucial step is to measure thread around your neck and cut accordingly with a scissor.
STEP3. Paint Macaroni
I used two colors – pink and sky blue so let me tell you the correct way to paint them. First, paint the front side of the macaroni and let it dry for a minute. Repeat the same step for the backside.
STEP4. Stringing
Stringing means putting macaroni pieces one by one into the thread. Let me give you a very helpful tip -You can take the help of a tweezer if the thread doesn’t come out easily from the holes of macaroni pieces.
STEP5. Knotting
At last, tie a knot thoroughly and drop a pinch of glue to fix it permanently. Finally, trim extras and you are ready to wear them for you.
See, how easy and cool is to turn food into gorgeous jewellery pieces in extraordinary ways. Teach your kids and let them use their imagination. Each idea counts and each talent needs to be showcased. Isn’t it?
Fascinating Story – Turning Hamburger into Brooch
I found a superbly creative thing that truly amazed me is that how a hamburger is preserved and turn out into Brooch as an accessory made by Tasmanian Jewellery. Emma burg stated, “some burgers from fast-food chains if left uneaten would last for years“. This incredible piece of news was published by abc.net.au you must check it out.
I hope you had fun learning food jewelry with this tutorial. Do share your ideas, opinions, or suggestions with me, I would love to see them. Stay tuned for exciting tutorials coming your way. Till then, Thank you for learning, and Happy Crafting!