How to make an easy safety pin bracelet at home. Friends, I made a beautiful pom-pom style bracelet today and I am going to present the complete guide to you.
Safety pin bracelet making is one of the easiest and fun crafts anyone could try at home. Also, you don’t have to struggle for supplies because they are daily items you can easily find at your home.
I am a huge fan of minimalistic jewelry so I just thought to add a spark by adding pom-poms. This will make it more charming and match any outfit.

How to Make an Easy Safety Pin Bracelet – 15 Steps with Pictures
Making a simple yet stylish safety pin bracelet requires minimum materials. Being an economical minimalistic jewelry piece, it is easy super easy, and won’t take much time to craft.
Start learning intricate designs, polish your skills and make your own unique patterns and sell them on the e-commerce platforms like Amazon, Etsy, and eBay to make decent income from hoe.
| Step1. Gather Essential Materials |
| Step2. Put pearl beads into the safety-pin |
| Step3. Insert a pom-pom and pearl bead into the headpin |
| Step4. Make a loop to close the edge |
| Step5. Insert a pom-pom and pearl bead into the eye-pin |
| Step6. Make a loop to close the end |
| Step7. Repeat Step5 and make five more decors |
| Step8. Connect a jump ring to the Safety pin |
| Step9. Connect eye pin hangings to the jump ring |
| Step10. Make a chain-like bracelet |
| Step11. Connect second jump ring at the other end |
| Step12. Repeat Step9 |
| Step13. Connect sliding hook lock at the end |
| Step14. Connect a jump ring to the other side |
| Step15. Ready to wear |
Let me share a step-by-step tutorial to illustrate how a stunning bracelet using a safety pin at home.
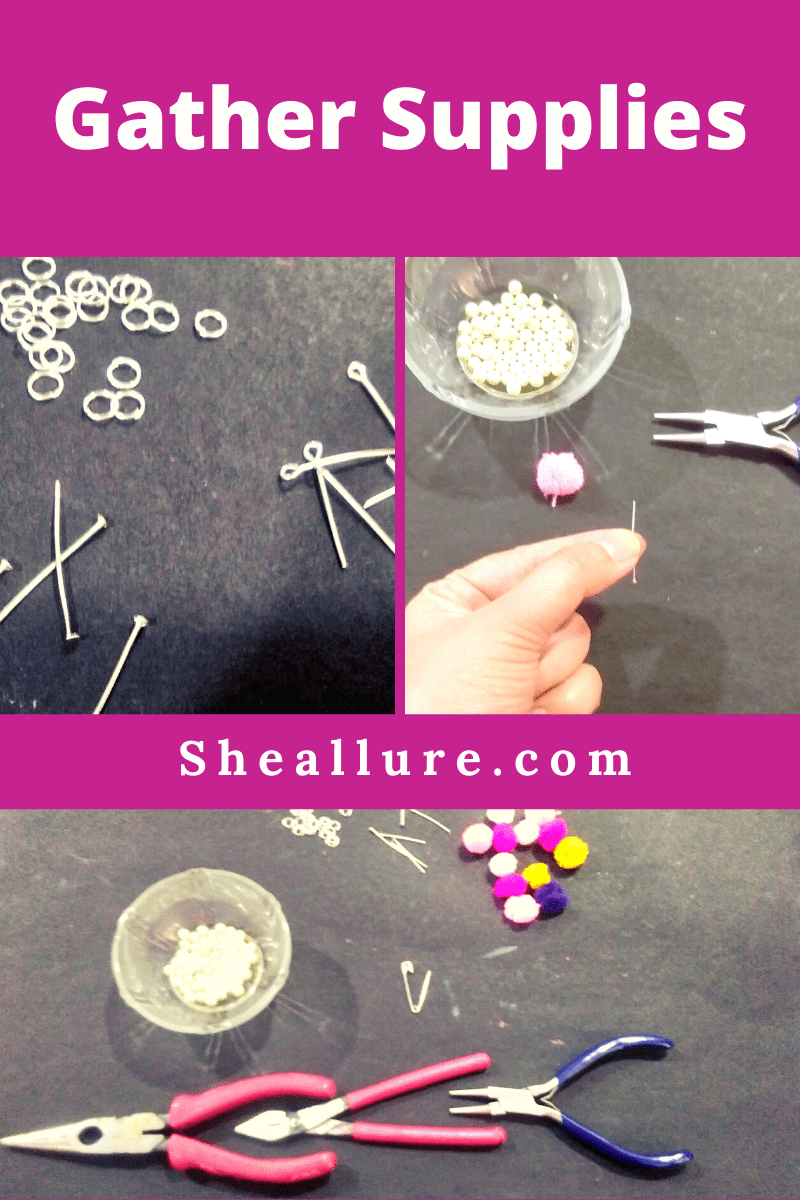
STEP1. Gather Essential Materials
The first and foremost step is to gather essential materials that I will list out for you. Take a quick look and start making a stunning bracelet with me.
Materials required to Make a Safety Pin Bracelet
- Safety Pin
- Pearl beads
- Pom-poms
- Round nose plier
- Flat nose plier
- Side cutter nose plier
- 3 jump rings
- A couple of Headpins
- Eye pins
- Sliding Hook lock
STEP2. Put pearl beads into the safety-pin
Now, the next step is to put at least 3 pearl beads into the safety pin to give a stylish look. If you don’t have pearls, you can use seed beads. They look super stunning. Let me share a sneak peek.
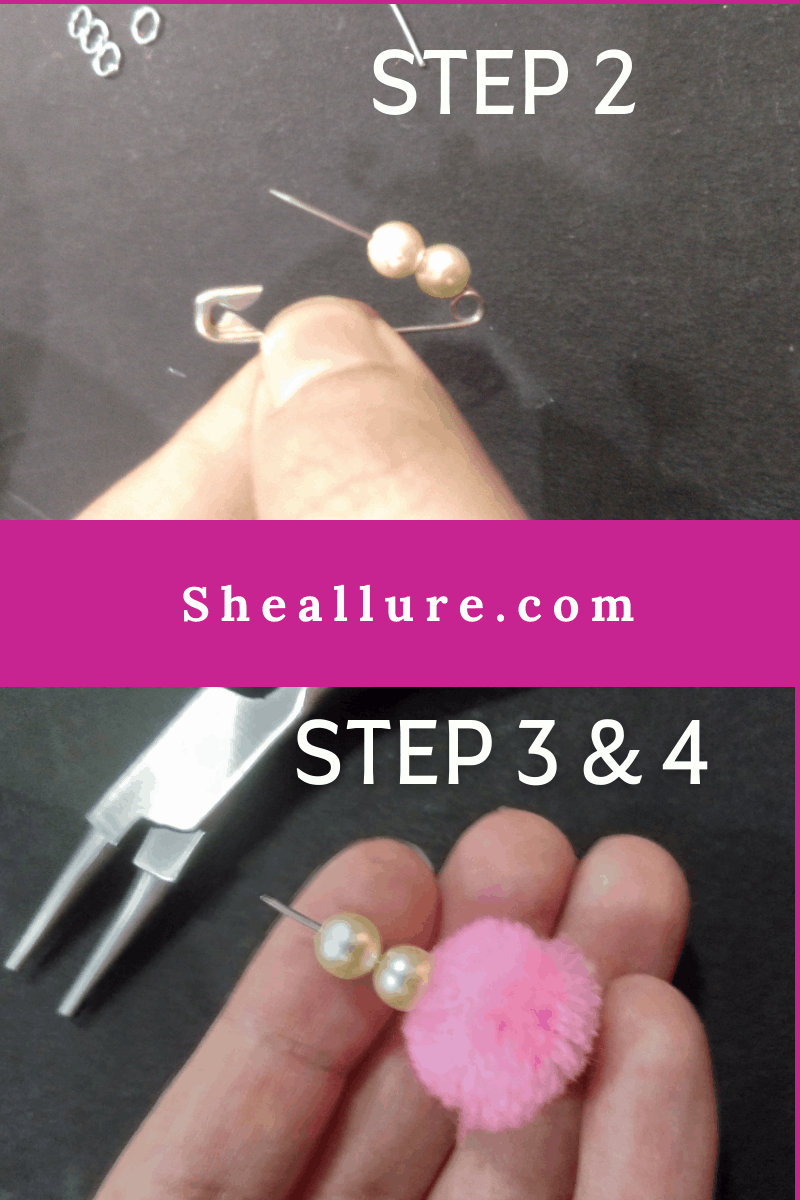
STEP3. Insert a pom-pom and pearl bead into the headpin
One of the best parts you will love is making a beautiful hanging. Take a headpin and insert one pom-pom and pearl bead.
STEP4. Make a loop to close the end
This is the most crucial part to make a hanging. Use a round nose plier slightly bent a bit and make a loop to close the end. Let me demonstrate with the help of an image.
STEP5. Insert a pom-pom and pearl bead into the eye-pin
Just like we used a headpin now we will make a chain bracelet using eye pins. Add a pom-pom and pearl bead into the eye pin.
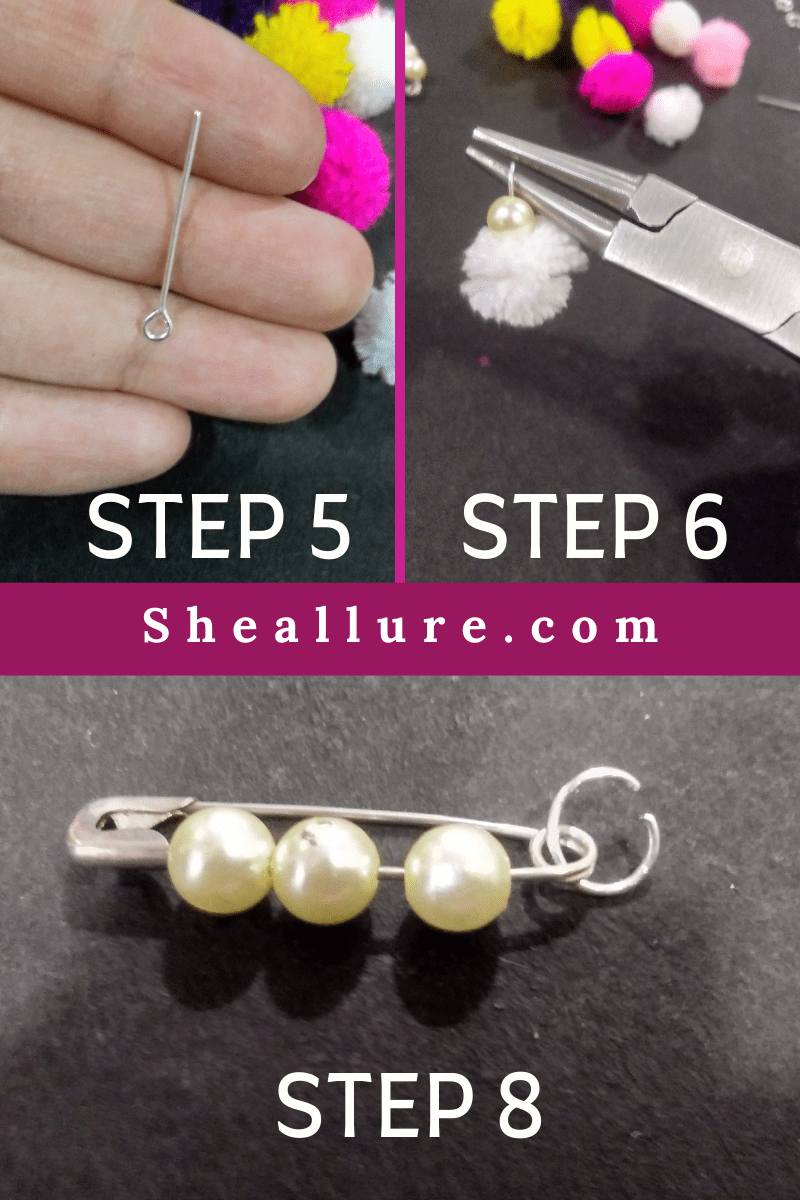
STEP6. Make a loop to close the end
Finally, repeat step4. Use a round nose plier and make a loop to close the end of the eye pin.
STEP7. Repeat Step 5 and make five more decors
Make five more colorful decors using an eye pin. This is required to connect each decor and make a chain bracelet with the help of a loop.
STEP8. Connect a jump ring to the Safety pin
Now, put at least three pearl beads into the safety pin and connect the jump ring to the small hole of the safety pin.
STEP9. Connect eye pin hangings to the jump ring
We will make a chain-like bracelet here, so let’s connect the eye pin beautiful hangings further to the jump ring.
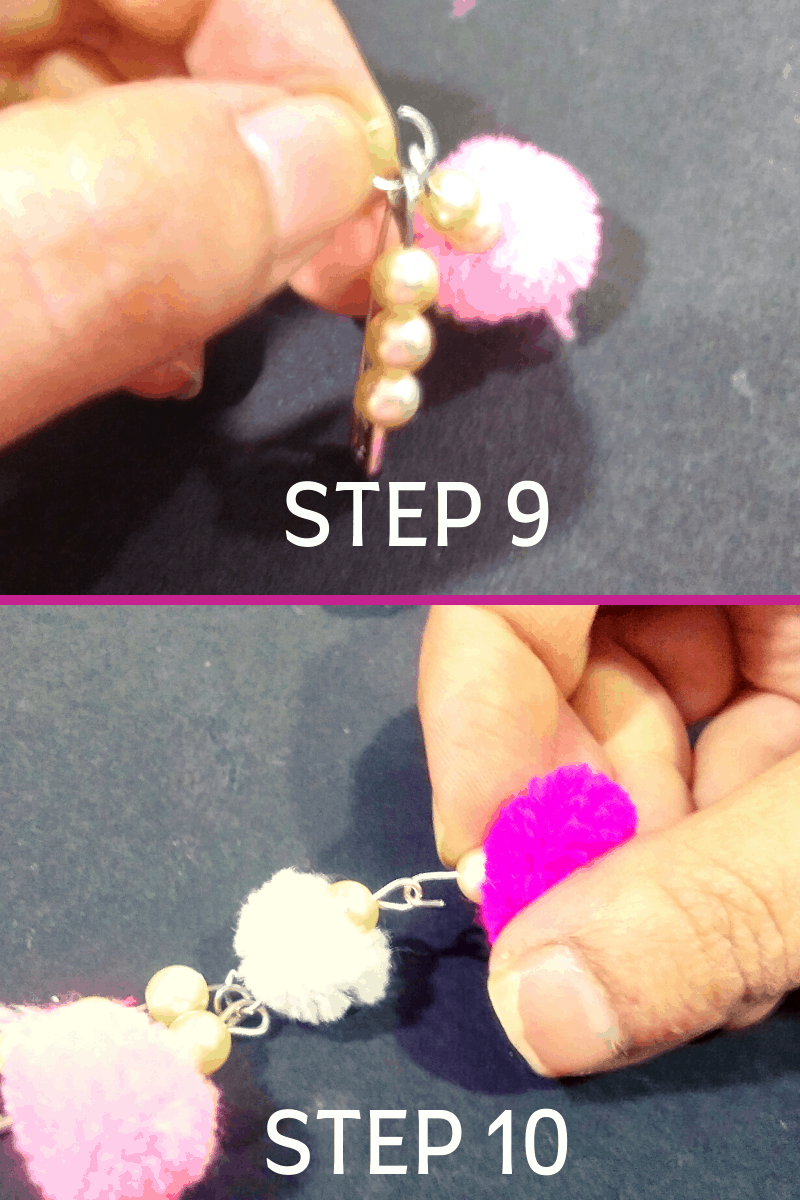
STEP10. Make a chain-like bracelet
Repeat the same procedure and make a lovely bracelet by connecting hangings and jump rings together. This will be our first chain.
STEP11. Connect second jump ring at the other end
As we’ve finished the first layer of the bracelet, the next step is to connect a jump ring to the other end of the safety pin.

STEP12. Repeat Step9
Repeat step 9 explained above. Put all eye pin hangings and jump rings one by one and make a second layer.
STEP13. Connect sliding hook lock at the end
At last, we have reached the closure. Connect a sliding hook at the end of the bracelet. This is required to lock your bracelet piece. If you want to learn the complete guide on jewelry-making tools read my recent blog.
Step14. Connect a jump ring to the other side
The most important step is to connect a jump ring at the end of the loop. This is required to perform locking purposes with a sliding hook.
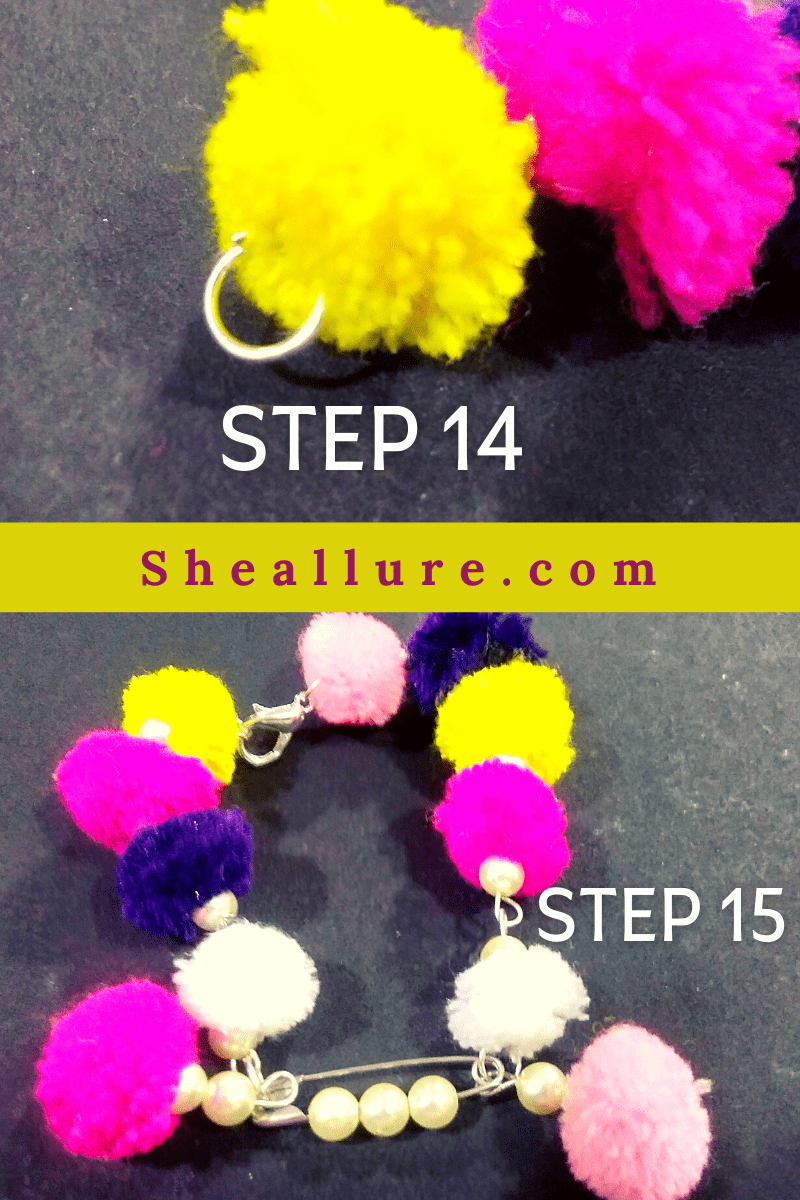
Step 15. Ready to wear
Voila! Your stunning pom-pom style safety pin bracelet is now ready to flaunt. Perfect match with any outfit due to multicolored. Slay it.
Can we Make an Easy Safety Bracelet using a Fabric?
Oh yes! Why not? One of the fabulous ideas for any jewelry designer is to weave the fabric into the safety pin. Weave back and forth into the front part of the safety pin gaps till you reach the end. Finally, make a knot of the fabric and trim extras.
Get the complete tutorial ideas on the world’s popular DIY craft platform – WikiHow. You will get dozens of ideas, right from using a wire and connect safety pins to craft an easy safety pin bracelet using a watch. Quite interesting ideas. Go ahead and enjoy.
3 Most Creative & Budget-friendly Bracelet Ideas to Try During Quarantine
As the pandemic hits hard the entire world, one of the best recommendations by experts is Crafting. Also, one of the articles by Forbes talks about the incredible benefits of crafting. It plays a role in improving your mental health.
A safety pin is a basic supply easily available at home. So, why not make a fashionable bracelet out of it. All you need is a bunch of safety pins handy with you, jump rings, seed beads, and pliers. Let’s unleash more DIY bracelet ideas.
1. Single chained bracelet
You need a metal chain, a safety pin, seed beads, pair of jump rings, and a flat nose plier. The first step is to open the safety pin and put the seed beads and close it.
All you have to do is to connect safety pin ends with jump rings and further with a metal chain on both sides. Finally, connect a sliding lock.
2. Oval Beaded Safety Pin Bracelet
The beaded bracelet is slightly different from the first one. Use long oval beads and seed beads and put them on the safety pin and close it. The pattern of putting the beads is one seed bead, oval bead, and again seed bead. This should be the design pattern.
Once you have all the safety pin designs ready with you, now we will string them into a stretchable cord. Finally, knot at least twice and glue the knot using super glue or hot glue.
3. Plastic Strap Safety Pin Bracelet
You will need plastic, seed beads, a safety pin, charms, super glue, and a scissor. Cut thin strips of plastic the same size as your wrist. Decorate plastic pieces with charms.
Make a small hole at the center point of the plastic strips to allow the jump ring to pass through it. String beads into the safety pin and finally connect with jump rings
.
Friends, I hope you find value in this tutorial. Do share your thoughts with me in the comment section below. Stay tuned for more interesting crafts coming your way in my next blog. Till then stay home, stay safe and Happy Crafting. Cheers!