Beginner’s guide for making wooden pendants is designed for entrepreneurs wanting to make professional pieces from scratch and make a decent income through selling online.
This comprehensive guide consists of researching, woodworking methods to make ethereal collections at home. Make your customers fall in love with your designs.
Let me walk you through the step by step instructions to make artistic handmade pendant at home. First, take a quick look at this graphic and understand how materials are used to make a beautiful pendant.

Beginner’s Guide for Making Wooden Pendants | 14 Crucial Steps
Beginner’s guide for making wooden pendants involves fourteen crucial steps that will help you kickstart with a little bit of woodworking, carving, sanding and polishing to make stunning handmade pendants.
| STEP1. Learn Basic Methodology |
| STEP2. Choosing the Best Technique |
| STEP3. Gathering Supplies |
| STEP4. Wood Cutting |
| STEP5. Wood Carving |
| STEP6. Sanding |
| STEP7. Drill Holes |
| STEP8. Painting Wood Shapes |
| STEP9. Connecting Shape with String |
| STEP10. Stringing |
| STEP11. Knotting |
| STEP12. Waterproofing |
| STEP13. Let it dry |
| STEP14. All done |
Let me share some buzzing trends I’ve recently discovered that will ignite your creativity.
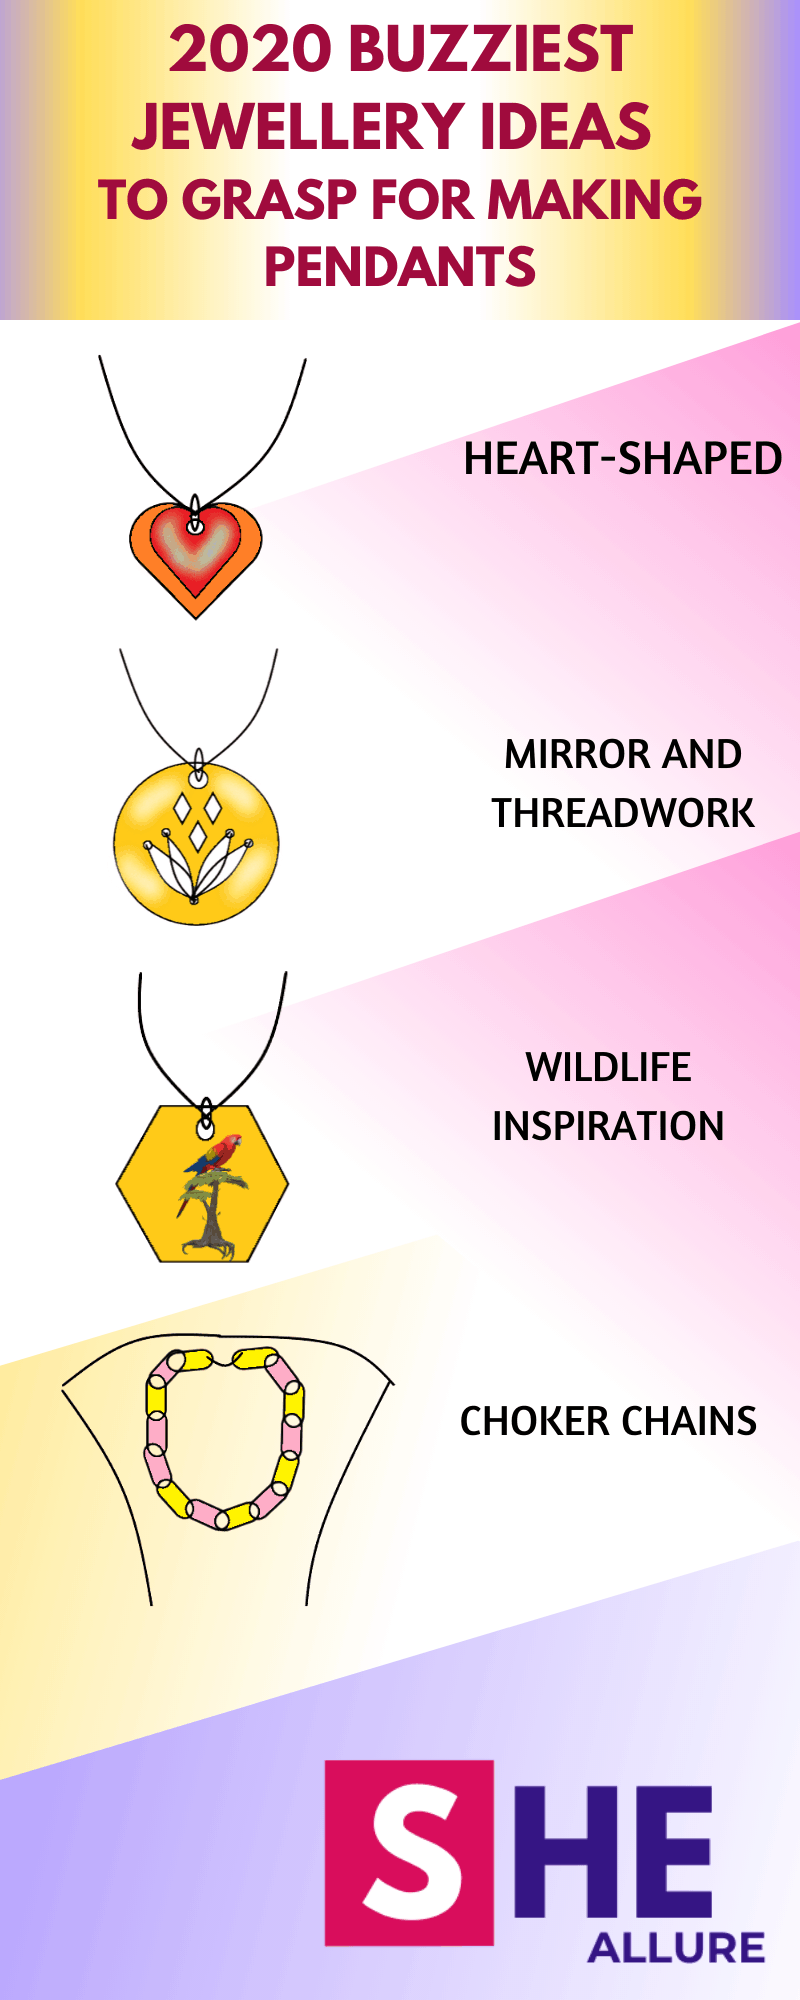
I hope you got some idea on buzziest pendant designs. Now let us learn how to make wooden pendants.
Step1. Implement Basic Methodology
For every jewellery designer there are five vital steps to follow such as Ideate, forge, design, polish and showcase jewellery. Read the steps carefully and proceed further.
Step2. Choosing the Most Feasible Method
The second step is to understand wood cutting methods and choosing the best suitable one you think is suitable for you.
Wood Cutting Methods for Making Pendants
- Manual Tools
You will require hacksaw for manual woodcutting which is quite cumbersome for beginners. Stay super alert if you are doing it for the first time. Do not harm yourself.
- Laser Cutter Technology
You don’t have to own this technology. Look for places and get access to it. You will get fancy wood shapes as per your choice for making a beautiful pendant.
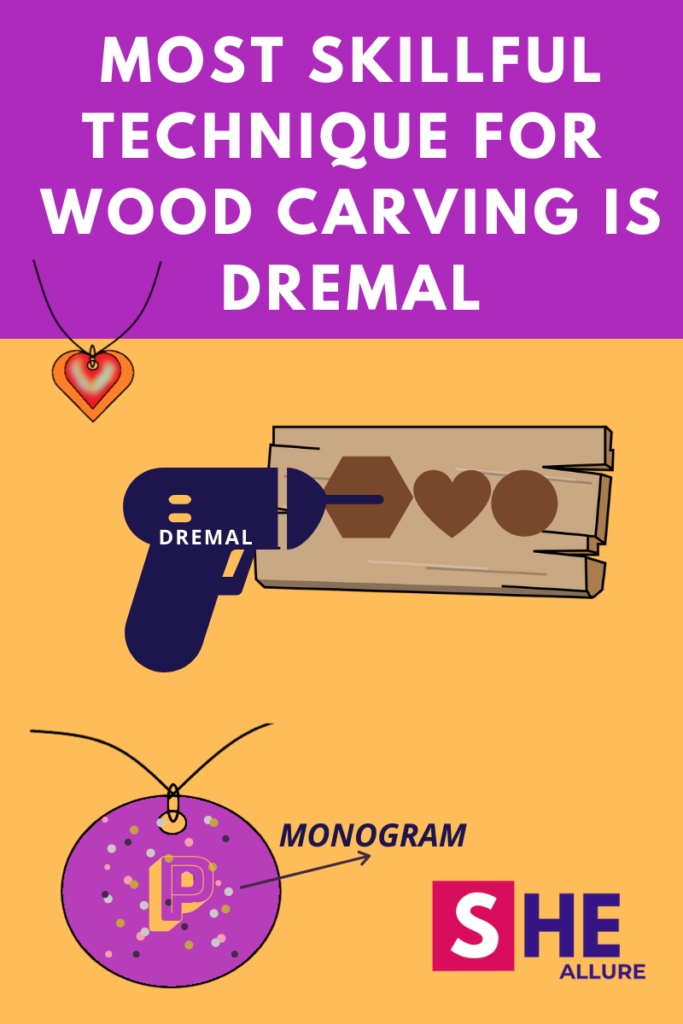
- Dremel Machine
Dremel is a wonderful all-in-one machine that is handy and works very fast. You can cut, carve, sand, polish and clean up tasks with this amazing machine.
Think wisely and choose the most feasible woodcutting method. By the way, you can also get the desired shapes from a carpenter.
Step3. Essential Supplies for Making Wooden Pendants
Suppose you chose manual woodcutting procedure, let me list out the materials required for making a wooden pendants.
- Wood Pieces
- Wooden Beads
- Chisel
- Hacksaw
- Carving Knife
- Nylon Thread
- Acrylic Paint Colors
- Jump ring
- Pencil/ Marker
- Regular Varnish
- Glue
Step4. Forging Wood Shapes
Make an outline on the wood piece and proceed with cutting wood using a hacksaw. If you are not comfortable with this method, go straight for Dremel or get fancy shapes from Laser cutter technology.
Step5. Wood Carving
Wood carving is the most popular artwork practiced worldwide. First, make a design or a monogram on wood shape. Start scraping wood with a chisel or dremel (in case you are comfortable working with Dremel). Let me show you a beautiful graphic.
Step6. Sanding Wood Shapes
Smoothen off unfinished wood shapes with a fine quality sandpaper. Rub it until you see the uneven scratches are complete gone. You will get a fine finished pendant.
Step7. Drilling a Hole
Mark a central point on the wood shape and drill a small hole. This procedure is required to insert a jump ring into the hole. Please do it accurately.
Step8. Painting Wood Shapes
Playing with colors is the most fun part of this tutorial. Paint beautiful shades and make your pendant appealing and irresistible for your customers.
Step9. Connect Wood Shapes
Connect jump ting into the hole then put a nylon thread pass through the jump ring.
Step10. Stringing
This step is optional if you want a simple pendant. You can add colorful beads to enhance the look of your pendant.
Step11. Knotting
Knotting is the most crucial step to make handmade jewellery. Tie knots at least thrice so that it won’t unravel. Drop a pinch of glue to the knotting part.
Step12. Waterproof your Pendant
Don’t forget to secure your pendant against moisture. Take a thin paintbrush, a varnish and damp cloth. Apply varnish in small amounts. Your pendant won’t tarnish and gives a glossy effect.
Step13. Let your wooden pendant dry
Varnish will take at least 24 hours to dry. Leave it overnight and see the beautiful glossy effect the next morning.
Tip: Make sure to use turpentine oil to clean your paintbrush and prevent it from getting hardened.
Step14. Ready to Wear
Voila! Your gorgeous wooden pendant is now ready to flaunt.
Fascinating Ideas to DIY Indian Style Pendants
When we talk about the Indian ethnic style pendant the first thing that comes to your mind is – Gold and silver. They are massively popular in India for centuries. Let me share some interesting ideas with you.
1. Reinventing Old Jewellery
I truly don’t believe in throwing away old stuff, they are a treasure. Therefore, Instead of spending extra bugs on purchasing beads, charms, you can use it from your old jewellery to make a brand new piece.
2. Threadwork
Sewing gives an ethnic touch to your jewellery perfectly match with ethnic outfits. Plan a design, drill some holes on the wood shape to accomplish embroidered pendant. This idea is damn good and innovative.
3. Tassel work on Wooden Pendant
Tassel is a trending embellishment everywhere. Tuck them into the holes and make stylish modernized pendant of your style.
4. Pom Pom Pendants
Pom pom looks super cool and popular idea for making jewellery. Just as a tassel, you can add pompoms to enhance the beauty of your pendants that looks fabulous with any outfit.
Most Helpful FAQs for DIY Beginner Jewellery Designers
I have designed these faqs especially for beginners who still have doubts in their minds. Here are seven helpful queries you need an answer. Take a peek and feel free to ask any question you may have. I’ll be happy to help.
| Q1. What is the alternative method of manual wood cutting method? |
| Ans. Laser cutter technology and Dremal are the alternative methods. You can try purchasing from the Amazon store. |
| Q2. How can we carve a monogram on the wooden pendant as a valentine gift? |
| Ans. As explained above, you can carve using a chisel or a Dremel. Make an outline design with a marker or pencil and proceed. |
| Q3. Is it easy to perform thread work on the wood? |
| Ans. Yes, it’s fun and easy. All you need is to drill some holes to the wood shape to perform this artwork. |
| Q4. Can we make paper jewellery at home instead of wood? |
| Ans. Yes. Paper Jewellery making is the most popular, cost-effective and eco-friendly method you can try and learn paper quilling technique. |
| Q5. Where can we purchase chains for making wooden pendants? |
| Ans. Gold or silver chains can be easily purchased from the local market or from the Amazon store or you may use chains from your old jewellery, no purchase required. |
| Q6. What is the alternate method for cutting jewellery? |
| Ans. Besides laser cutters and dremel, you can go straight for buying ready-made wooden shapes and beads. |
| Q7. Which type of wood should we prefer for making wooden pendant? |
| Ans. Balsa wood is a preferred wood type that is soft and light-weighted for making handmade jewellery. |
I hope you find this tutorial helpful. Do try making your own designs and share with me. I would love to see them. Let’s inspire each other and grow as successful entrepreneurs. Happy Crafting!
