Beginner guide for wooden jewellery making is the most popular craft focused on making eco-friendly jewellery from scratch. Let’s learn woodworking skills and have fun.
The best thing I love about wooden jewellery is that it is light-weighted, cost-effective, easy to cut and amazing material for making personalized engraved gifts.
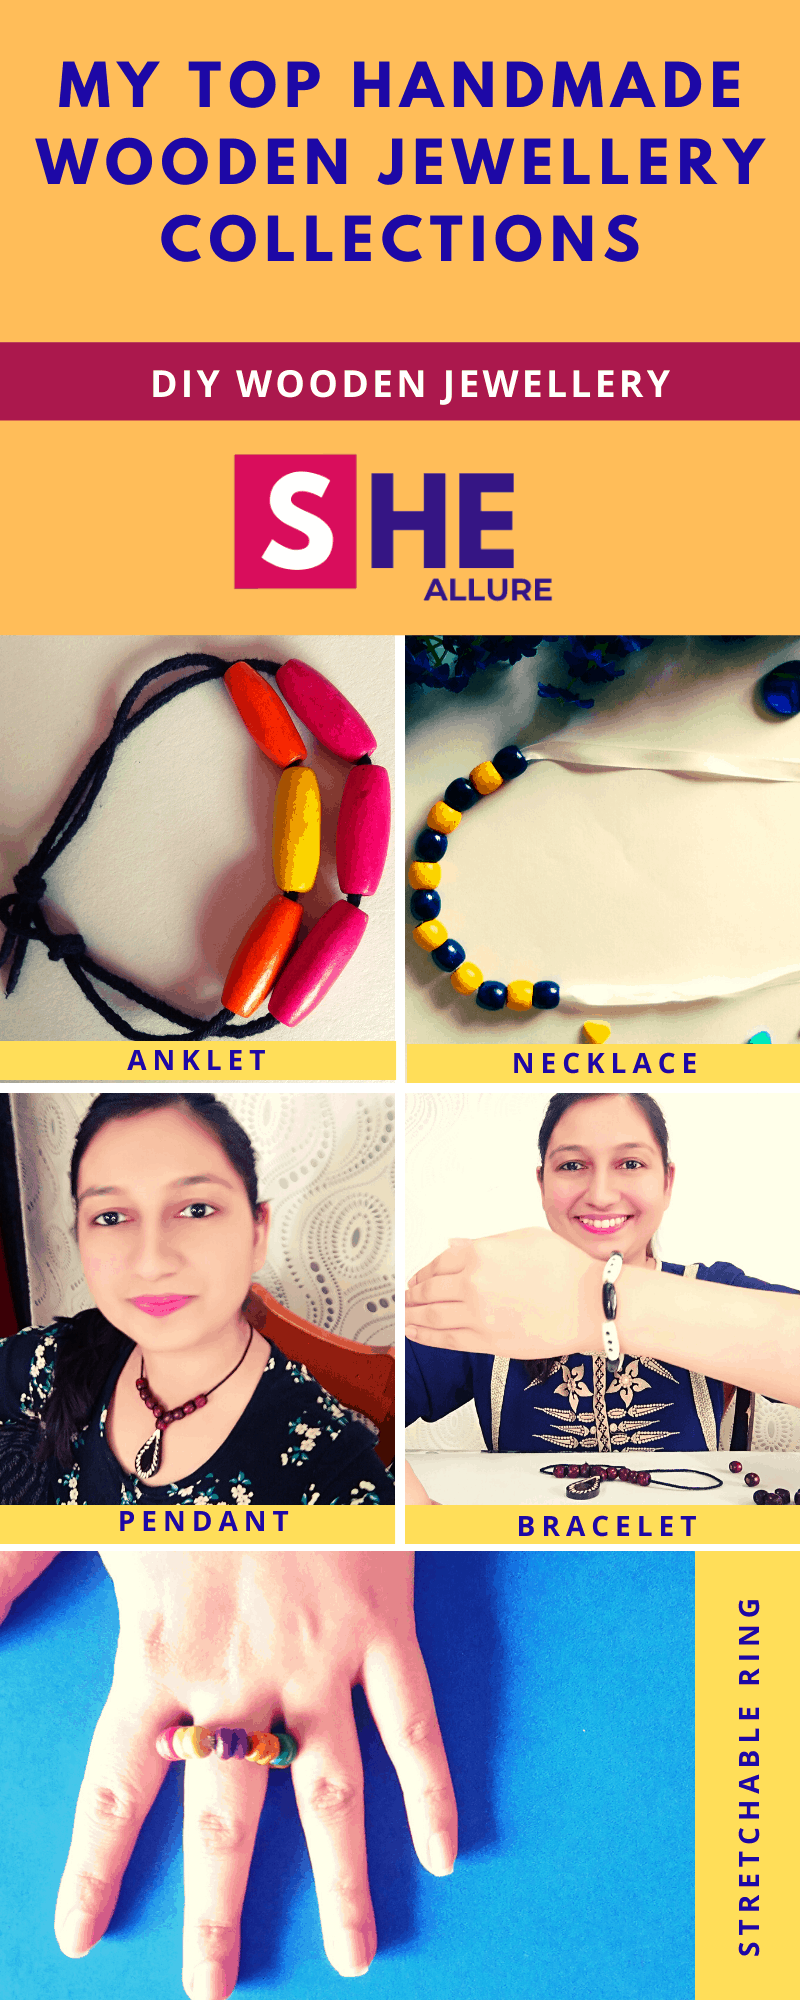
I began making jewellery with a simple wooden bracelet and a pendant and I love it to the core. You too can start making jewellery and up your level by practicing at home.
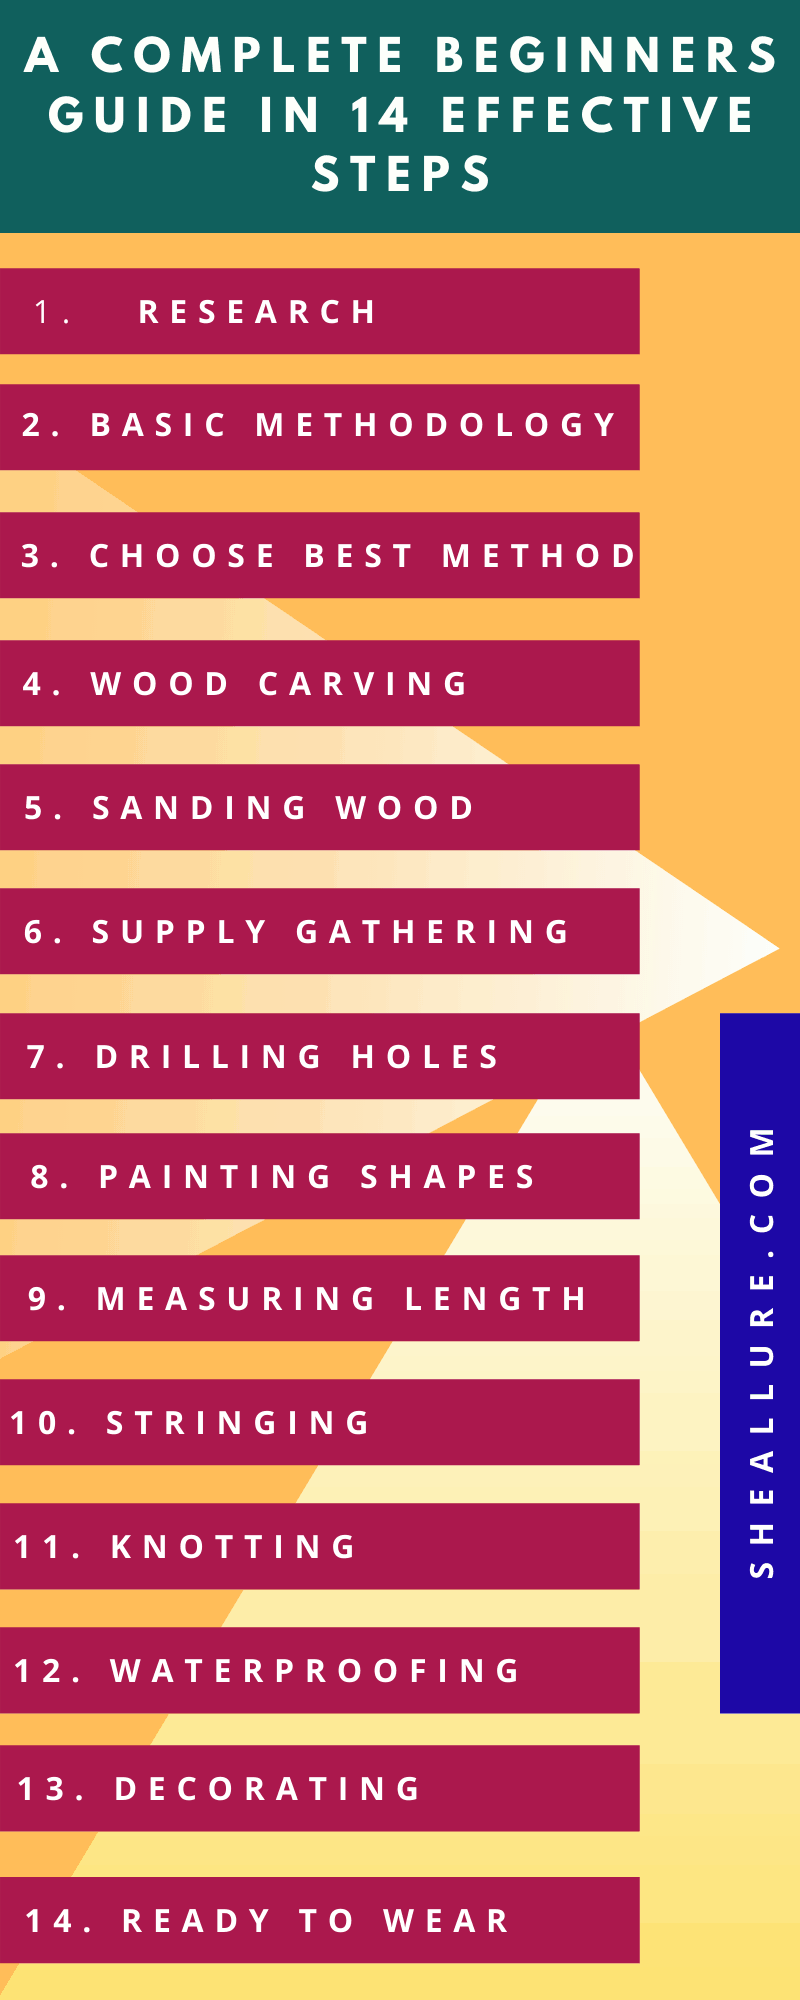
Beginner Guide for Wooden Jewellery Making at Home in 14 Effective Steps
Beginner guide for wooden jewellery making has been designed in detail stating important steps that should be followed. Let us learn from scratch and make beautiful pieces.
Before we begin, I am happy to share my exclusive handmade wooden jewellery creations. Hope you like them. Take a look.
DIY Wooden Jewellery in 14 Crucial Steps
Beginner guide for wooden jewellery making tutorial has been articulated in fourteen steps in detail that involve woodworking skills. Practice and try making your own beautiful designs. Let us begin.
| STEP1. Research on Wooden Jewellery Trends |
| STEP2. Learn Basic Methodology |
| STEP3. Choose the Best Method |
| STEP4. Wood Carving |
| STEP5. Sanding Wood |
| STEP6. Supply Gathering |
| STEP7. Drilling Holes |
| STEP8. Painting Wood Shapes |
| STEP9. Measure Thread Length |
| STEP10. Stringing |
| STEP11. Knotting |
| STEP12. Decorating |
| STEP13. Waterproofing |
| STEP14. Ready to wear |
Step1: Strenuous Research on Jewellery Trends
The first crucial step before you begin making wooden jewellery is doing research on trends. Use your imagination and make your original handmade jewellery pieces at home.
The whole idea to make a perfect blend that looks trendy, stylish yet original. That’s the mantra to become a successful DIY jewellery designer.
As per the latest buzzing news, I would say, jewellery like choker chains necklace, hoop earrings, pearl pendants, funky thread style anklets, crystal jewellery, old traditional necklace are taking the center stage.
Step2: Execute Basic Methodology
Recollect and implement five vital points i.e ideate, forge, design, polish, and showcase to proceed further.
Plan and design a stunning digital layout of the jewellery piece you have in mind. Save a copy and proceed with some woodworking that I’ll explain in the next step.
Step3: Woodcutting
To get fancy wood shapes, there are four amazing techniques you must be aware of. Depending on your budget you can choose the best method of your choice. Let me share the five techniques in detail with you.
Choosing the Most Feasible Wood Cutting Method
- Manual Wood Cutting Method
Wood is a raw material used in furniture, home decor, jewellery and whatnot. To cut wood for making jewellery with manual tools, it requires hacksaw, drill, carving knife and Chisel.
The best thing about manual woodcutting procedure is they are economical. But one needs to super alert while doing this task by hand so as to not harm yourself anyway.
- Recycle Wood for Making Jewellery
By using scrap wood pieces will not only cut down the costs but also a great idea to save trees. Don’t throw wood leftovers just use them for your projects.
You can find them easily at your home gardens, construction sites where people throw them and don’t realize they are a treasure for us. Let’s save our planet and stop cutting trees. Reuse and make your crafts.
- Get access to a laser cutter technology
Laser cutting technology is a boon to all DIY jewellery designers to get those fancy shapes. You don’t have to own this technology, get access to the places and your job is done.
- Dremel Machine
Dremel machine is very handy and easy for jewellery crafters to cut, carve, sand, buff and clean jewellery. Their multifunctionality makes it popular and preferred device.
You can read the manual carefully, understand the attachments and start making beautiful wood shapes for making jewellery. If you want to save your time go for this device.
- Readymade Wood Shapes
For a beginner, getting readymade wood shapes is indeed a great idea to start jewellery making at home. You can even get help from your kids. They’ll love it.
You can purchase readymade supplies such as wooden beads, wood shapes depending on what kind of jewelry you want to craft. This can also be purchased from an Amazon store.
Step4: Supply Gathering
After wood cutting process, the next crucial step is to gather essential supplies for making beautiful designer jewellery at home. Let me share the list with you.
- Wood Shapes
- Drill Machine
- Wood Beads ( Small and Big sizes)
- Pearl Beads/Charms
- Paintbrush (thin and thick size)
- Nylon Cord or Chains
- Threads
- Needle or Skewer
- Acrylic Paints
- Jump Rings
- Hook Connectors
- Lobster or Spring Clasp
- Glue
- Scissors
- Metal wires (optional)
- Pliers
- Dremel
- Chisel
- Pencil
- Sandpaper
- Varnish
You can explore more information with my recent post on wooden jewellery making supplies.
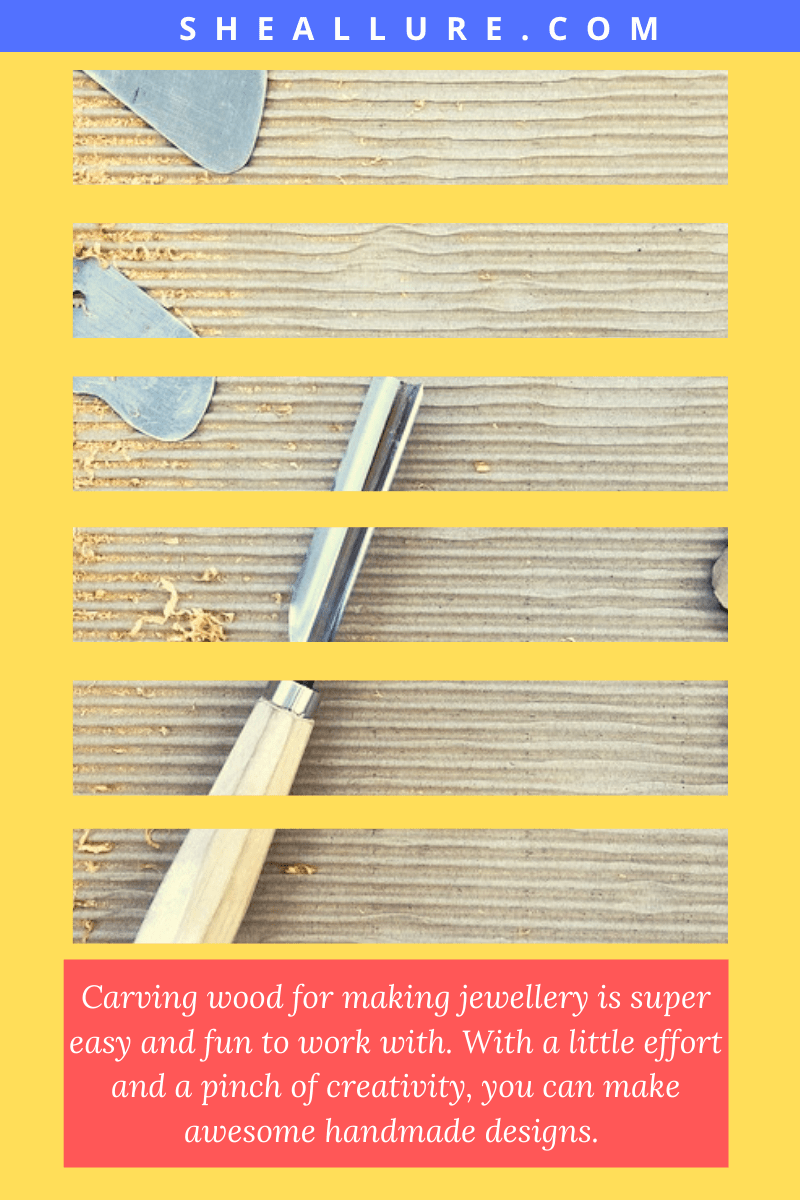
Step6: Make Personalised Wood Carved Jewellery Piece
Carving wood is a very popular method that originated from centuries. With a little effort and a pinch of creativity, you can make awesome designs for yourself, gifting, and even sell them online.
Popular Wood Carving Techniques for Jewellery Making
- Dremel Machine: To perform wood carving using a dremel, first draw a layout design on the wood with a pencil and use a carving tool and start engraving on wood.
- Chisel as Carving tool: If you want to learn manual wood carving, chisel is an amazing tool that works by scraping on the wood shape. It is the most economical way of carving wooden jewellery but time-consuming. You got to have a lot of patience while hand-carving on wood.
Step7: Sanding Wood
Sanding wood can be accomplished in two ways- One way is using sandpaper that works by rubbing unfinished wood shapes to get a finished piece.
Another method is using a dremel. Use a padded tool and begin carefully sanding until the blemishes are completely gone.
Step8: Drilling Hole
To accurately perform drilling, mark a center point on a wood shape and make a hole. Insert a jump ring to the hole to allow the stringing process.
Step9: Painting Wood Shapes
The most awaited step is painting wood shapes. Use colorful shades to make beautiful jewellery piece. Let the paint dry for few seconds.
Step10: Measuring Thread Length
To make jewellery like a pendant or necklace requires the correct measurement of a thread. Use an inch tape and take an accurate measurement of your thread.
Step11: Stringing Beads
Connecting shapes and beads are an integral part of the stringing process. Insert your thread into the jump ring and start stringing wood shapes and beads one by one.
Step12: Knotting
Knotting is a very crucial part that complete the process. Tie at least three knots so that it won’t unravel. Snip off extra threads using a scissor.
Tip: Drop a pinch of glue to the knotting part that fixes completely.
Step13: Waterproof your jewellery
Waterproofing wooden jewellery is an important part that makes prevents your jewellery from getting tarnished. Don’t ever forget to polish your wooden jewellery well.
Take a thin paintbrush and gently apply varnish in small amounts to your jewellery piece. Let your jewellery dry at least 24 hours.
Step14: Decorate
By decorating, I mean adding eye-popping embellishments such as resin beads, glass beads, polymer clay slices, tassels, and sprinkles that enhance the look of your jewellery. Voila! Your exclusive handmade jewellery is ready.
If you want to learn about embellishers, I am happy to share my recent post on homemade wooden jewellery ornaments that will give you more ideas.
Must-Read Faqs for Beginners
| Q1. What kind of wood should we prefer for making jewellery? |
| Ans. Balsa wood is the best wood type and the reason being, it is soft, light-weighted, and comfortable for the wearer. And, Materials like oak wood are hardwoods. |
| Q2. Is it easy to cut wooden jewellery at home? |
| Ans. No. It isn’t at first. In fact, you might find the whole process hard and tedious. Cutting wood for making jewellery at home may seem inconvenient at first but with practice, you will master woodworking skills. |
| Q3. What is the alternate method for cutting jewellery? |
| Ans. I would suggest laser cut technology or a dremel. The second very popular method is by using a dremel. Out of these Dremel is quite handy, easy to operate and popular device for professionals. Moreover, you can also buy readymade wood shapes and beads from the local craft or amazon store. |
| Q4. How can we hide the knot? |
| Ans. Take a needle and gently put the knot inside the bead hole. This way, the knot won’t be visible. |
| Q5. What kind of wooden shapes we can use for making pendants? |
| Ans. Oval, Circular, Square, Tear Drops, Triangular and heart-shaped. |
| Q6. Where can we buy jewellery supplies? |
| Ans. Every professional craftsperson must-have a basic jewellery supply kit is available. I would recommend you buy from the local market or online from the Amazon Store |
| Q7. Should we use Resin Hardeners instead of Varnish? |
| Ans. For beginners, I would not recommend using Resin Hardeners. Reason being, they might harm your skin and you need to strictly follow safety precautions.Moreover, resin hardeners are difficult to use in winters because they become thick and release micro-bubbles. In order to counter these bubbles, you will need to maintain an ideal temperature of around 24 to 30 degrees. |
| Q8. How to prevent paintbrush from hardening? |
| Ans. This is a very important question post the waterproofing process. Clean your paintbrush using turpentine oil and wipe it with a cotton cloth to prevent it from getting it harder. |
| Q9. Do we require to cover the jewellery in order to dry it? |
| Ans. Don’t cover, let it dry as it is. This will help in drying up the jewellery faster. |
| Q10. Can we make wooden rings without woodworking? |
| Ans. Yes, absolutely. Beginners can make aesthetic wooden rings without any hassle of woodworking methods. By the way, I have shared my own hand creation as a stretchable wood bead rings, you can have a look at my latest published blog. |
| Q11. How can we efficiently use leftover wood blocks for making wooden jewellery ornaments? |
| Ans. Reusing is a highly recommended method as it is cost-effective. To use it efficiently and perform wood cutting, carving and sanding wood I would recommend using a Dremal machine. |
| Q12. What is the most credible online resource for ordering cutting and carving tools? |
| Ans. You can easily get access to the huge variety of credible and authentic tools for making wooden jewellery at Amazon. The price margins are also great. Plus you can read tons of customer reviews before buying. |
| Q13. Where can we buy a fine quality Sandpaper? |
| Ans. You can buy sandpaper from the local market or online from the Amazon store. |
The whole idea behind this tutorial- “Beginner guide for wooden jewellery making” is to upskill your craft and make smashing creations that make a lasting impact on your customers.
I hope you find this tutorial helpful. Do try making yourself and feel free to share your thoughts, suggestions, or ideas with me in the comment section below. I would love to see them. Thank you.
