Handmade jewellery tips are designed for beginners as well as hobbyists who want to learn detailed insights nobody will reveal. I got it covered for you all.
Right from researching, choosing the best material to woodworking, carving, and polishing jewellery pieces. Also, you will learn some amazing ideas that saves money.
Not only you will learn tips to craft jewellery but also profitable ideas that will surely help you shine as entrepreneurs. Let’s learn and make your dreams come true.

70 Incredibly Creative Handmade Jewellery Tips You Must Learn Today
Handmade jewellery tips are designed for everyone no matter you are a hobbyist, novice, or an expert jewellery maker, the following tips will bring confidence in making professional pieces at home.
1. Research on Jewellery Trends is Mandatory
For those willing to make extraordinary jewellery, the first crucial handmade jewellery tip is – Research on the current jewellery trend and make your own original pieces. Originality matters.
2. Always Kickstart with a Plan
Planning a design layout is the foundation of handmade jewellery for the designer. Make a digital layout and save it somewhere before you begin.
3. Material Knowledge is Essential
Gather ample knowledge is an important handmade jewellery tip for a professional jewellery designer. An entrepreneur who sells handmade pieces must be able to resolve customer queries on the material. Knowledge builds trust.
4. Choose The Best Quality Materials
If you want to build a successful handmade jewellery business, never compromise on product quality. Quality is the major factor that builds trust and more clients in the future hence choose the best in class materials.
5. Correct Measurement
Whether you are making a beautiful necklace, ring, pendant, bangle, or earrings, measurement is the crucial handmade jewellery tip the defines the look and comfort. If the measurement is inaccurate the whole point of making and selling jewellery become void.
6. Separate Work Space
Separate workspace for handmade jewellery makes it easy and handy for a designer. Keep your tools, beads, shapes, supplies, jewellery findings and thread pieces separately and in the box.
7. Jewellery making Course is a Must
It is advisable for a beginner to hone their skills and start making professional handmade jewellery at home. Learning new creative ways works best in the long-run. There are dozens of free online courses to learn and grow as a professional designer.
8. Must-Learn About Jewellery Findings
It is important for a jewellery artist to learn the following terminologies-
- Clasp
- Hook Connector
- Jump ring
- Eye-pin
- Head Pin
- Ear wires
- Chandeliers
- Bead Caps
That’s not all, there are more findings to learn as you level up your skills.
9. Plier using Tips
Pliers are significant tools for twisting, bending shapes you must-have to make a masterpiece. By the way, I love wire looping concepts where you can shape them to make amazing pieces like pendant, earrings, and whatnot.
10. Knotting Thrice
Efficient knotting binds jewellery pieces together. If you are making a bracelet, make sure you knot at least thrice efficiently so that it won’t unravel.
11. Glue the Knotting Part
Post knotting process, drop a pinch of glue to fix it permanently. This is one of the best ever handmade jewellery tips for all that is mostly forgotten.
12. Don’t Forget to Hide Knot
Jewellery with visible knot looks shabby. Therefore, It is paramount to hide the knotting part, this can be accomplished with the help of a toothpick or a needle. Insert knot inside the bead with a toothpick.
13. Learn Correct Way To Paint Beads
You will not like your hands to get mess up if you hold beads. There is a correct way of painting beads, all you need is a skewer or long woo stick and proceed with painting beads.
Working with Wood – Jewellery Tips for Beginners
Let me give you some important handmade wooden jewellery tips right from woodcutting methods, carving to waterproofing wooden jewellery pieces that are usually missed out.
14. Learn Wood Cutting Methods
For beginners who never tried their hands in making wooden jewellery. There are four amazing ways of forging wood shapes.
- Manual Wood Cutting
- Woodcutting using Dremel
- Laser Wood Cutting
For making an artistic wooden jewellery, you can choose any of the methods and start making your own pieces at home.
15. Wood Carving Using Dremel
One of the fastest ways to make handmade personalized jewellery tips is wood carving. By using Dremel you can easily carve a beautiful design or a message on wooden ring or a pendant as an expression of love.
16. Don’t forget to waterproof your jewellery
This is a common mistake done by jewellery designers. Always make your wooden jewellery pieces water-resistant using good quality varnish. By using varnish, your jewellery will shimmer.
17. Use E6000 Glue for Boho Mirror Style Pendant
Boho mirror style wooden pendant can be easily made by stick mirror shapes, this can be permanently fixed with E6000 super glue. Always use it for adding mirror shapes as embellishments.
Must-Know Sanding Tips for Woodworkers
Wooden jewellery is incomplete without sanding wood as it removes the uneven edges/scratches. Let me share two most helpful tips while making handmade wooden jewellery.
18. Always use 100 Grit Sandpaper
Before you jump into polish wooden jewellery, it is crucial to smooth out the rough surface of wood pieces. Always use 100 grit sandpaper for a perfect finish.
19. Consider Sponge Buffs for Wooden Rings
If you are working on a woodworking project on making rings. Always perform sanding using fine sandpaper and sponge pad. This will give a perfect glossy finished look to wooden rings.
Making Resin Jewellery is Fun – Tips for Designers
Resin jewellery is fun to craft but one needs to be careful while curing resin to make handmade jewellery. The reason being, it requires proper room temperature to make a beautiful piece at home.
Let me share resin handmade jewellery tips to make your crafting easy and fun.
18. Epoxy Resin is Recommended for Beginners
For beginners, epoxy resin is recommended because of its significant features. By taking precautions, one can craft stunning pieces like pendant, rings, earrings, etc. at home.
19. Handmade Resin Jewellery Using Paper Clips
To make a lovely triangular shaped pendant using a paper clip and epoxy resin, use flat nose plier, a side cutter, and round nose plier to flatten, twirl and cut wires.
20. Resin Jewellery without Moulds
The most fascinating part of handmade resin jewellery is you can craft without mold. Suppose you want to make a beautiful stone ring. Place a plastic sheet on a table, put small stones, and pour epoxy resin to it and leave for 24 hrs. Connect with ring base and it’s ready to wear.
21. Snip off Extra Resin Once Cured
Let’s take an example that you made a resin ring, once you have the cured resin snip off extras with a scissor. This step is mostly forgotten and you will get a nicely shaped ring.
22. UV Resin requires Special Equipment for Curing
The reason why epoxy resin is better is that UV resin requires ultraviolet light to cure while epoxy doesn’t. Hence, epoxy resin works better for making jewellery.
23. Consider Art-Resin for Kids
It is advisable to go for art-resin if your kids are learning to make resin jewellery. It is safe for use and mostly used by art teachers in schools.
24. Dremel Is Advisable For Sanding Resin
You can always go for sandpaper but it is quite a tiresome procedure as you need to use different grit sandpapers. Hence, dremel is a better option that saves your time.
DIY Resin Jewellery Safety Tips To Keep in Mind
Working with resin requires certain precautions for jewellery designers. Let me share some super important tips you must know.
25. Always Wear A Face Mask
Epoxy resin is liquid form produces fumes, hence it is recommended wearing preventive clothing as a face mask and keep yourself as safe.
26. Don’t submerge in Water
Don’t wear them while taking a shower or swimming as the metal around the resin will get tarnished. It is recommended to take off your jewellery before these activities.
27. Avoid Exposing to Harsh Chemicals
Please make sure to keep away resin jewellery from harsh chemicals or products like perfumes. This will cause your resin jewellery tarnished. Avoid it.
28. Avoid Prolonged Exposure to Sunlight
Be extra careful with resin jewellery. Prolonged exposure with sunlight will soften resin or causes it to discolor. Keep your jewellery in a normal temperature.
29. Avoid Resin Rings While Dishwashing
Always remove your resin rings while dishwashing. Like I have mentioned above resin jewellery should not be submerged in water.
Budget-Friendly Handmade Paper Jewellery Tips
Paper quilling art has been practiced for centuries and very popular artwork worldwide. For entrepreneurs, this is one of the cheapest business ideas that will yield decent income.
30. Toothpick for Paper Quilling
Did you know you can make paper quilled earrings without purchasing toolkit? Well, I have exclusively made paper quilled earrings using a toothpick and newspaper and it was indeed a fun task. I bet you must give it try.
31. Make Floral Earrings with Recycled Paper
Recently I made beautiful floral paper earrings with old notebook cover. Cut long strips, roll up with a toothpick to make flower petals, glue the ends. Finally, connect floral earrings with earring hook.
32. Embroidery Work by Drilling Holes
Just imagine how a simple wood piece can turn out an artistic jewellery piece with beautiful embroidery work? Well, it’s truly a fun craft, all you need is plan embroidery design then drill holes on the wood shape. Start sewing with colorful threads into the holes and make stunning jewellery designs.
33. Make Rings from Scrap Wood & Epoxy Resin
Let me share an amazing handmade jewellery tip on how to make a wooden resin ring from scrap wood piece. Take a wood piece, transparent tape, and epoxy resin. Wrap the tape to the lower part of the wood piece and pour resin and sparkles. Let it dry for 24 hrs and your beautiful ring is ready to wear.
DIY Tips for Anklet Lovers
Anklet making is the popular DIY crafts every designer loves doing it and sharing amazing tutorials. Recently, I made a funky beaded anklet for myself.
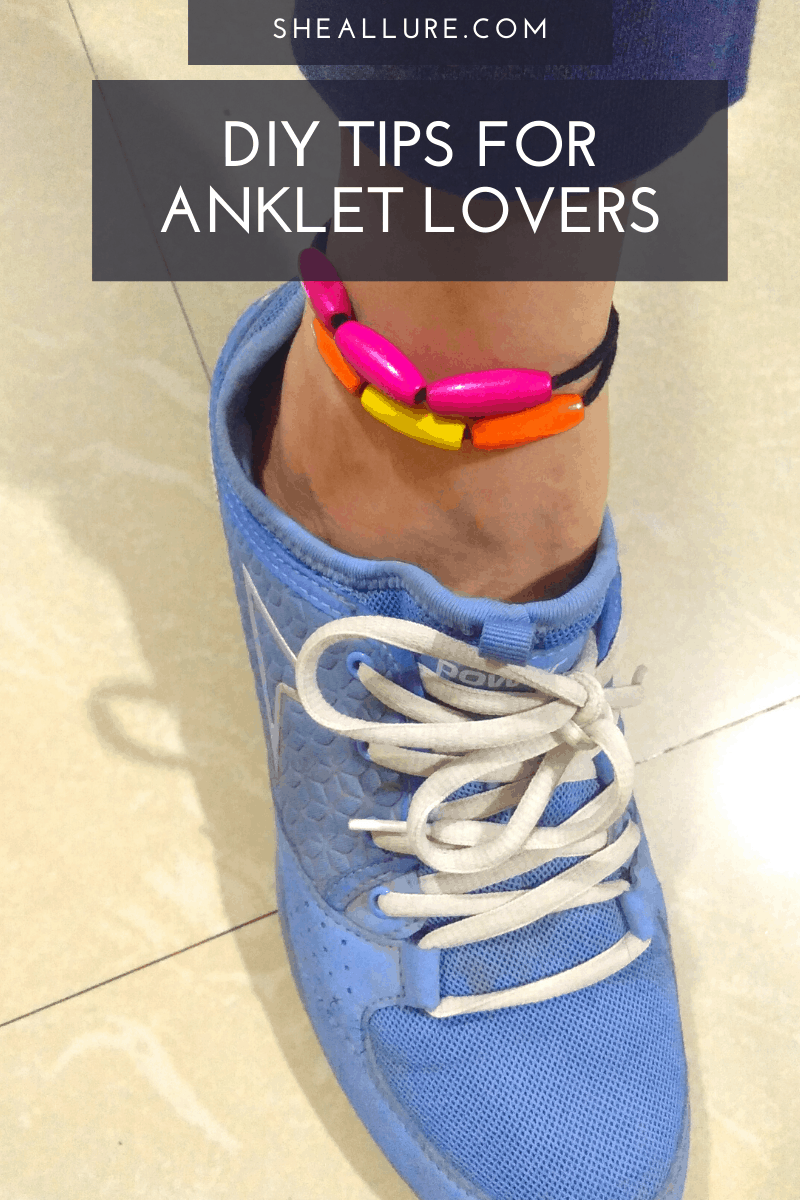
34. Begin with low investment materials – Thread
It is advisable for beginners to start with a thread instead of purchasing chains at first. Make a beautiful anklet with a minimum possible cost. It’s easy, fun and gives a fabulous look with your footwear. Let me show you my handmade piece. I love it.
35. Use Lobster at the End of Chain Anklet
If you are using a chain to make a party wear anklet connect jump rings and a lobster clasp to both the ends. Lobster plays a crucial role to lock your anklet.
36. Drilling hole to Make a Wooden Heart Anklet
Always mark the accurate points to the wooden heart shapes before you start to drill holes. Make two holes to upper sides to allow thread pass through it for making a stunning anklet.
Profitable Jewellery Selling Tips For Entrepreneurs
One of the popular questions asked by jewellery designers is about selling handmade jewellery. Let me share some amazing handmade jewellery selling tips.
37. Selling with Popular Ecommerce Platforms
For any professional designer, it is important to know the core places to gain significant benefits from selling handmade jewellery.
- Amazon
- Etsy
- Flipkart
38. Make Professional Pieces
If you want to succeed on the business front, craft impeccably professional handmade jewellery and not making an experimental piece. I would suggest you spend some quality time doing jewellery making course.
Perfect Photography Tips of Your Handmade Jewellery
Learning basic Photography tips is essential for entrepreneurs that make a huge impact on your prospective clients. Let me share some of the easiest photography tips that will save your cost.
39. Tips Click Professional Product Pictures
For a professional jewellery designer, it is important to learn to click professional photographs to showcase your product. You can also do it with your mobile, tripod, and use some jewellery stands.
40. Tips to DIY Lightbox
Do you know you can click professional pictures with a white background using a lightbox? It’s simple, Cut the two sides of the box and stick white chart paper using a transparent tape. Light up a table lamp and start taking your jewellery pics.
41. Make use of Props
In case you aren’t using a lightbox let me share some cool handmade jewellery photography tips. Use white stones, jewellery stands, artificial flowers, flower vase to make a beautiful background. Highly recommend.
Gift Your Best Buddy A Beautiful Jewellery
One of the most adorable gifts you could ever give for your buddy is a stunning handmade jewellery wrapped with attractive gifts. Let me share valuable gifting and jewellery tips for your loved one.
42. Pocket Paper Gift Bags
You can make cute small pocket paper bags to gift handmade jewelry in a triangular shape and wrap it with a ribbon.
43. Hairclips from Leftover Wood Piece
Cut wood pieces to a rectangular shape and make beautiful hair clips as a gift for your buddy. Paint wood shape, let it dry and decorate with embellishments.
44. DIY Bracelet with a Safety Pin
Wondered how to make a lovely bracelet by using a safety pin? This is such an amazing and inexpensive idea that looks so adorable with casuals. Make handmade bracelets using seed beads and safety pins.
Choosing the Best Wood Type | DIY Wooden Jewellery Tips
This section is dedicated to crucial tips for making wooden jewellery. Beginners will find it easy to begin woodworking from scratch. Read carefully.
45. Consider these Wood Types for Personalised Gifts
If I talk about choosing the type of wood for personalised jewellery gifts, Consider Balsa, Pine and Palm wood. Reason Being, They are inexpensive and easy to cut using manual tools.
46. Choose Palmwood to Make Ethnic Jewellery
If you are a huge fan of making ethnic jewellery, go straight for Palmwood. They can be forged easily using a dremel or laser cutter machine to get fancy wood shapes. Make eye-popping ethnic designs that stand out.
47. Avoid Oakwood
For first-time woodworkers wanting to learn jewellery crafting, I would say, avoid hardwood types such as Oakwood. They are very difficult for manual woodcutting. Hence, not advisable for first-timers.
48. Balsa wood – Perfect for Newbies
Balsa wood being light-weight and fragile wood type, they are easy to cut and carved hence perfect for beginner jewellery artists.
49. Bamboo wood for Precious Jewellery
Did you know African style jewellery is made using Bamboo wood?. Well, this is a must-know fact for professionals to go straight for this wood type for making precious artistic wooden jewellery which is quite challenging.
50. Consider Birchwood for Making Head Accessories
Let me share the amazing fact- Birchwood has an incredible healing property to cure headaches. That is why they are mostly used for making head accessories.
Best Tips To Polish Wooden Jewellery
As you know, it is important to polish your jewellery. Let me provide some handy tips while working with wood. Take a quick note and do share it with your customers. After all, besides adorning we should take good care of our jewellery pieces.
51. Polyurethane Varnish Requires three Coat Layers
Whether it’s your furniture, home decor items, or wooden jewellery. Always coat three layers and allow it to dry for at least 3 days if you are using this type of varnish.
52. Regular Varnish takes 24 hours to Dry
As explained earlier, regular varnish takes 24 hours to dry and requires repolishing once in a month. This is how you should take care of your jewellery. It won’t tarnish.
53. Apply Varnish in one Go
This is a very crucial point if you are using Polyurethane Varnish, always apply in one go instead of back and forth whether you’re using wooden jewellery or furniture items.
DIY Ethnic Jewellery Making Tips
Ethnic jewellery crafts are very popular worldwide, especially in India. Let me share some impeccable craft tips on adding embellishments to give a new ethnic look to your jewellery piece. You will love it.
54. Use Threads For Making Tassels
Tassels are easily crafted from colorful threads. You can add them to make gorgeous hoop earrings, pendants, bracelets and necklace.
55. Consider 3D Emboss Paint on Wood Shape
If you are making a wooden pendant or necklace, draw a beautiful design on wood and start to paint using 3d Emboss colours. Golden colour is perfect for giving an ethnic touch to your jewellery.
56. Thread Wrapping and Reinvent Bangles
Consider this amazing tip, use old bangle, and wrap colorful threads around the bangles. Also, you can stick pearl beads or sparkles using a Fabric Glue.
57. Apply Polymer Clay Canes on Wood Beads
Make your wooden beads attractive by applying liquid glue on wood beads (16mm, Hole size 7 mm). Cut polymer clay can piece and put them on wood beads one by one. Press them with your fingers so that they are covered around the beads. Rollback and forth on your hand so clay canes don’t come out.
58. Add Embellishments to Your Wood Beads
After you paint all the wooden beads, glue embellishments to enhance the look of your beads. Make a beautiful beaded necklace for special occasions.
59. Rhinestone Beads to Resin Jewellery
Let me share the cool decorative ideas to resin jewellery. Use beautiful rhinestone beads while curing resin jewellery
60. Add Pearl Beads To Make Resin Rings
Give a nice shimmering touch to your resin rings with small pearl beads. They look gorgeous and add a spark to your jewellery piece be it necklace, ring, pendant, bracelet, etc.
Amazing Tips to DIY Wooden Ring For Men
61. Always Measure the Accurate Ring Size
Always use a ring sizing tool for measuring the accurate size to make a smashing wooden ring for the man of your life. You would never want to gift a ring that isn’t wearable.
62. Drill 5/8″ hole with Forstner Bit
Suppose you have a piece of wood and you want to make a ring shape. You will need forstner drill bit and make 5/8″ hole to the wooden block.
63. Wooden Ring Needs Two-way sanding process
One of the cheapest idea to sand unfinished wooden ring piece is to use 600 grit sandpaper. Rub it off until it smoothens. Repeat the same using a Spunge pad to give alluring shine.
64. Don’t forget to Buff it up with a Dremel
Once you have the finished wooden ring piece, you need to buff it up nicely to make a glimmering wooden ring for him. You will see a brand new professional wooden ring for your project.
65. Engrave wooden ring using Dremel
Gift the most adorable wooden ring for the love of your life with wood engraving. This is accomplished by using a dremel machine. Use it well and express your love with custom-made rings.
66. Turn wooden spoons into Personalised Jewellery & Save money
Make rare wooden jewellery gifts for him like tie clip, wrist bands, and stud earrings. Wooden spoons are easy to cut and carved. Gift cool accessories and make him feel special.
5-Minute Handmade Jewellery Crafting Tips
Let me share the most creative, inexpensive and fastest jewellery making tips to help you save your time and money.
67. Make a Stretchable Wood Beaded Ring
Take readymade wooden beads and elastic cord. Start stringing and finally tie knots at least thrice. It will take hardly 5minute to make a colorful beaded ring. Kids can also make it easily at home.
68. Connect Ring Base with Wood Shapes
If you the wood shapes and ring base ready with you. Color the shapes and use super glue to connect with a ring base. Easy and fun.
69. Use Buttons to Make a Bracelet
Take nylon cord and slightly big size bunch of buttons. Start stringing buttons one by one into the cord and knot at the end. So easy to make. Try it yourself.
70. Use Ribbon to Make a Necklace
Instead of using a cord or costly chains, why not using a ribbon and string wood beads? This is really creative, fast, and cost-effective jewellery crafts. You will love it.
I hope this guide has given enough information regarding jewellery making tips. Do share your feedback or suggestions with me in the comment section below. I would love to see them. Also, If you like this blog, do share it with your friends too. Stay tuned for more interesting tutorials and tips. Thank you.